Advanced&Efficient (A&E) Developer Guide
Table of Contents
- Overview
- Acknowledgements
- Setting up, getting started
- Design
- Implementation
- Documentation, logging, testing, configuration, dev-ops
- Appendix: Requirements
- Appendix: Instructions for manual testing
- Appendix: Planned Enhancements
Overview
Advanced&Efficient helps Emergency Department (ED) doctors in logging patient reports and connecting patients with relevant departments. It leverages on ED doctors fast typing skill by using the Command Line Interface (CLI).
This developer guide aims to guide future developers and maintainers of Advanced&Efficient by providing the implementation philosophy of the software design and features.
Acknowledgements
Advanced&Efficient is adapted from the AddressBook3 project by SE-EDU initiative.
Setting up, getting started
Refer to the guide Setting up and getting started.
Design
Architecture
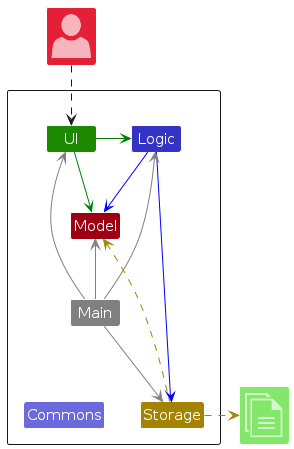
The Architecture Diagram given above explains the high-level design of Advanced&Efficient.
Given below is a quick overview of main components and how they interact with each other.
Main components of the architecture
Main (consisting of
classes Main
and MainApp) is
in charge of the app launch and shut down.
- At app launch, it initializes the other components in the correct sequence, and connects them up with each other.
- At shut down, it shuts down the other components and invokes cleanup methods where necessary.
The bulk of the app's work is done by the following four components:
UI: The UI of the App.Logic: The command executor.Model: Holds the data of the App in memory.Storage: Reads data from, and writes data to, the hard disk.
Commons represents a collection of classes used by multiple other components.
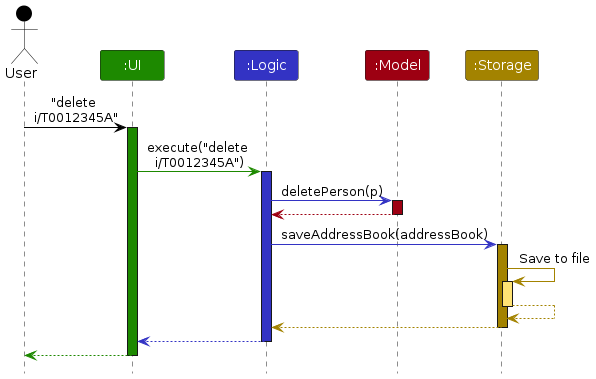
How the architecture components interact with each other
The Sequence Diagram below shows how the components interact with each other for the scenario where the user issues
the command delete i/T0012345A.
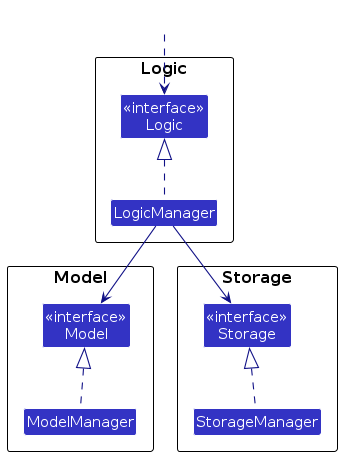
Each of the four main components (also shown in the diagram above),
- defines its API in an
interfacewith the same name as the Component. - implements its functionality using a concrete
{Component Name}Managerclass (which follows the corresponding APIinterfacementioned in the previous point).
For example, the Logic component defines its API in the Logic.java interface and implements its functionality using
the LogicManager.java class which follows the Logic interface. Other components interact with a given component
through its interface rather than the concrete class (reason: to prevent outside component's being coupled to the
implementation of a component), as illustrated in the (partial) class diagram below.
The sections below give more details of each component.
UI component
The API of this component is specified
in Ui.java
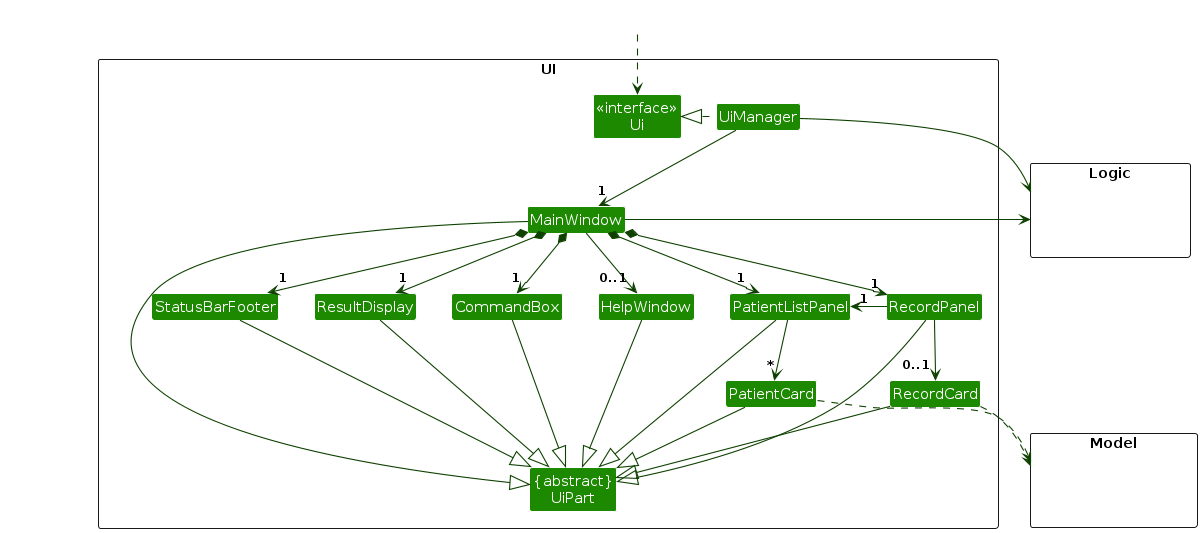
The UI consists of a MainWindow that is made up of parts
e.g.CommandBox, ResultDisplay, PatientListPanel, RecordPanel, StatusBarFooter etc. All these, including
the MainWindow,
inherit from the abstract UiPart class which captures the commonalities between classes that represent parts of the
visible GUI.
The UI component uses the JavaFx UI framework. The layout of these UI parts are defined in matching .fxml files that
are in the src/main/resources/view folder. For example, the layout of
the MainWindow
is specified
in MainWindow.fxml.
The UI component,
- executes user commands using the
Logiccomponent. - listens for changes to
Modeldata so that the UI can be updated with the modified data. - keeps a reference to the
Logiccomponent, because theUIrelies on theLogicto execute commands. - depends on some classes in the
Modelcomponent, as it displaysPatientorRecordobject residing in theModel.
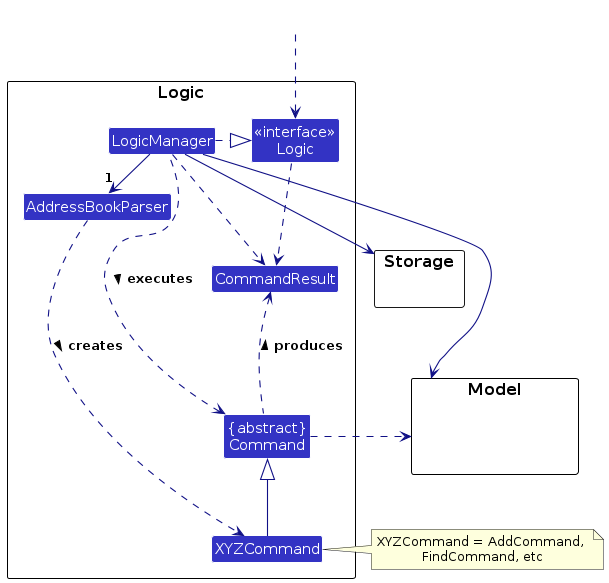
Logic component
API: Logic.java
Here's a (partial) class diagram of the Logic component:
For examples illustrating the interactions within the Logic component, please refer to the
Implementation section for the implementation of various commands.
Note: For the explanations below, we'll use the command XYZCommand and parser XYZCommandParser. XYZ is a
placeholder for the specific command name e.g., AddCommandParser.
How the Logic component works:
- When
Logicis called upon to execute a command, it is passed to anAddressBookParserobject which in turn creates a parser that matches the command (e.g.,XYZCommandParser) and uses it to parse the command. - This results in a
Commandobject (more precisely, an object of one of its subclasses e.g.,XYZCommand) which is executed by theLogicManager. - The command can communicate with the
Modelwhen it is executed (e.g. to perform the operation inXYZCommand). - The result of the command execution is encapsulated as a
CommandResultobject which is returned back fromLogic.
Here are the other classes in Logic (omitted from the class diagram above) that are used for parsing a user command:
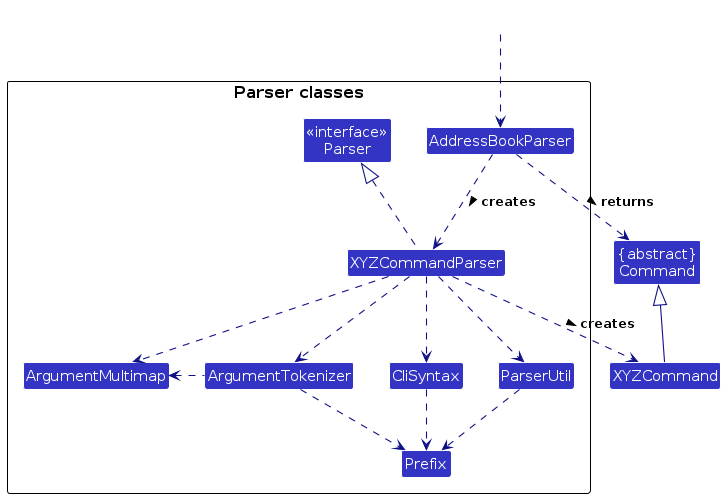
How the parsing works:
- When called upon to parse a user command, the
AddressBookParserclass creates anXYZCommandParserwhich uses the other classes shown above to parse the user command and create aXYZCommandobject (e.g.,AddCommand) which theAddressBookParserreturns back as aCommandobject. - All
XYZCommandParserclasses (e.g.,AddCommandParser,DeleteCommandParser, ...) inherit from theParserinterface so that they can be treated similarly where possible e.g, during testing.
Model component
API: Model.java
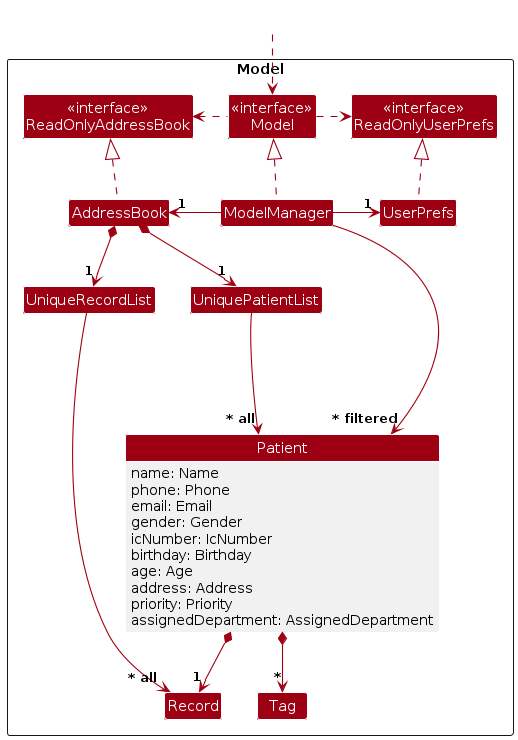
The Model component,
- stores the address book data i.e., all
Patientobjects (which are contained in aUniquePatientListobject). - stores the currently displayed
Patientobjects (e.g., results of a search query) as a separate filtered list which is exposed to outsiders as an unmodifiableObservableList<Patient>that can be 'observed' e.g. the UI can be bound to this list so that the UI automatically updates when the data in the list change. - stores a
UserPrefobject that represents the user’s preferences. This is exposed to the outside as aReadOnlyUserPrefobjects. - does not depend on any of the other three components (as the
Modelrepresents data entities of the domain, they should make sense on their own without depending on other components)
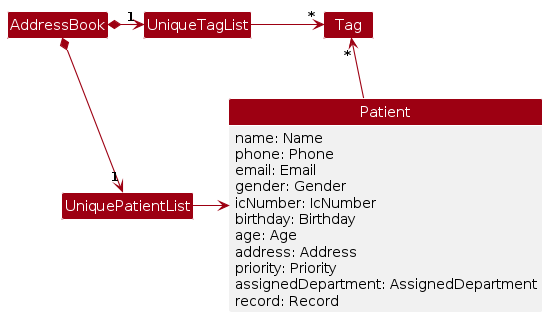
Note: An alternative (arguably, a more OOP) model is given below. It has a Tag list in the AddressBook,
which Patient references. This allows AddressBook to only require one Tag object per unique tag, instead of
each Patient needing their own Tag objects.
Storage component
API : Storage.java
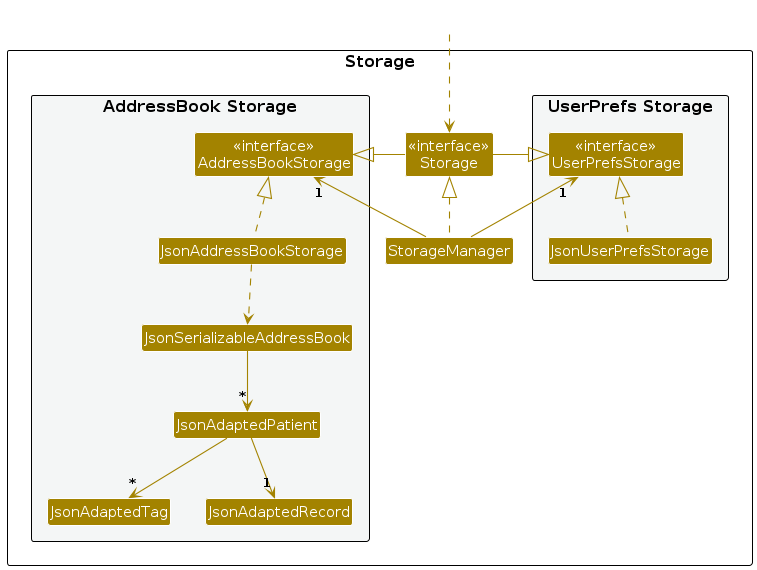
The Storage component,
- can save both address book data and user preference data in JSON format (e.g.,
aande.json), and read them back into corresponding objects. - inherits from both
AddressBookStorageandUserPrefsStorage, which means it can be treated as either one (if only the functionality of only one is needed). - depends on some classes in the
Modelcomponent (because theStoragecomponent's job is to save/retrieve objects that belong to theModel).
Common classes
Classes used by multiple components are in the seedu.address.commons package.
Implementation
This section describes some noteworthy details on how certain features are implemented.
Add patient feature
Implementation
The add patient operation is facilitated by AddCommandParser. AddCommandParser parses the user input string
and creates the AddCommand to be executed by the LogicManager. AddCommand extends Command and implements the
Command#execute method.
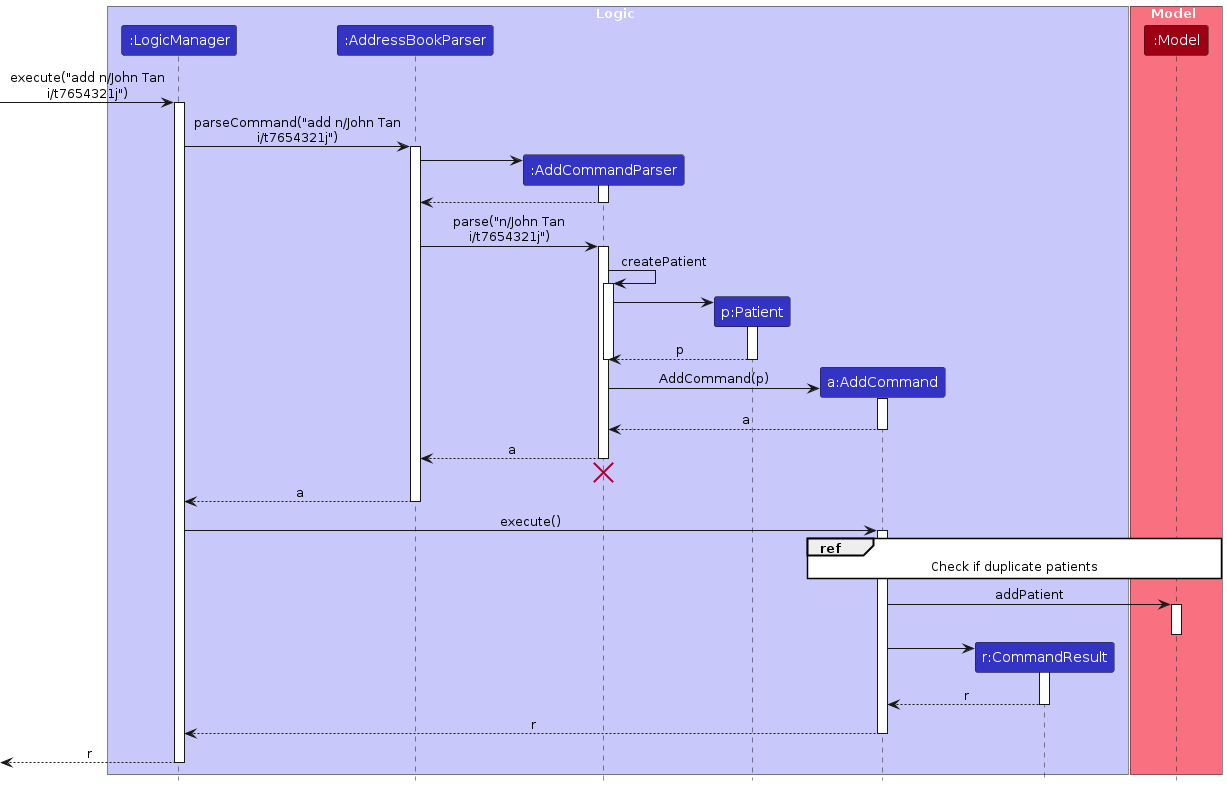
Given below is an example usage scenario and how the add patient operation is handled in A&E.
Step 1. Assuming the application has been launched, the user enters the required fields followed by any optional fields.
For adding only required fields, the user enters add n/John Tan i/t7654321j, which is to add
a patient with NAME = John Tan and IC_NUMBER = t7654321j.
For adding additional optional fields, the user enters add n/John Tan i/t7654321j p/90909090, which is to add the
optional field Phone = 90909090.
Note: From Step 2 onwards, we will assume user enters add n/John Tan i/t7654321j.
Step 2. LogicManager#execute would first invoke AddressBookParser#parseCommand which splits the
command word add and the argument n/John Tan i/t7654321j. After splitting, AddressBookParser#parseCommand would
identify
that the command is Add and instantiate AddCommandParser and call its AddCommandParser#parse to parse the
argument accordingly.
Step 3. AddCommandParser#parse will call AddCommandParser#createPatient method to create the patient with the
relevant fields and fills all optional fields
with default values otherwise. It is then passed as an argument to instantiate the AddCommand, which is then returned
by
AddCommandParser#parse.
Step 4. LogicManager#execute now invokes AddCommand#execute which checks for duplicate Patient. model#addPatient
is then called to add the Patient into the address book. It then returns a CommandResult stating the patient has
been listed.
Design considerations:
Aspect: How to handle required / optional inputs from users:
- Alternative 1 (current choice): Create
Patientwith the required fields and fill non-given optional inputs with default values.- Pros: Easy to implement.
- Cons: Since default values have to be valid as well, default values may seem too similar to actual value.
Eg. Default value for
GenderisOTHER, which is an actual value as well.
- Alternative 2: Use Java
Optionalclass to handle fields.- Pros: Implementation is neater and fields with no values can be represented by a warning message instead of a default value.
- Cons: Implementation is difficult and
Optionalclass have to be implemented correctly to ensure it works with other components of the codebase.
Delete patient feature
Implementation
The delete mechanism is facilitated by DeleteCommandParser. DeleteCommandParser parses the user input
and creates the DeleteCommand. This DeleteCommand extends Command and is then executed by the LogicManager.
The Command#execute method is then called.
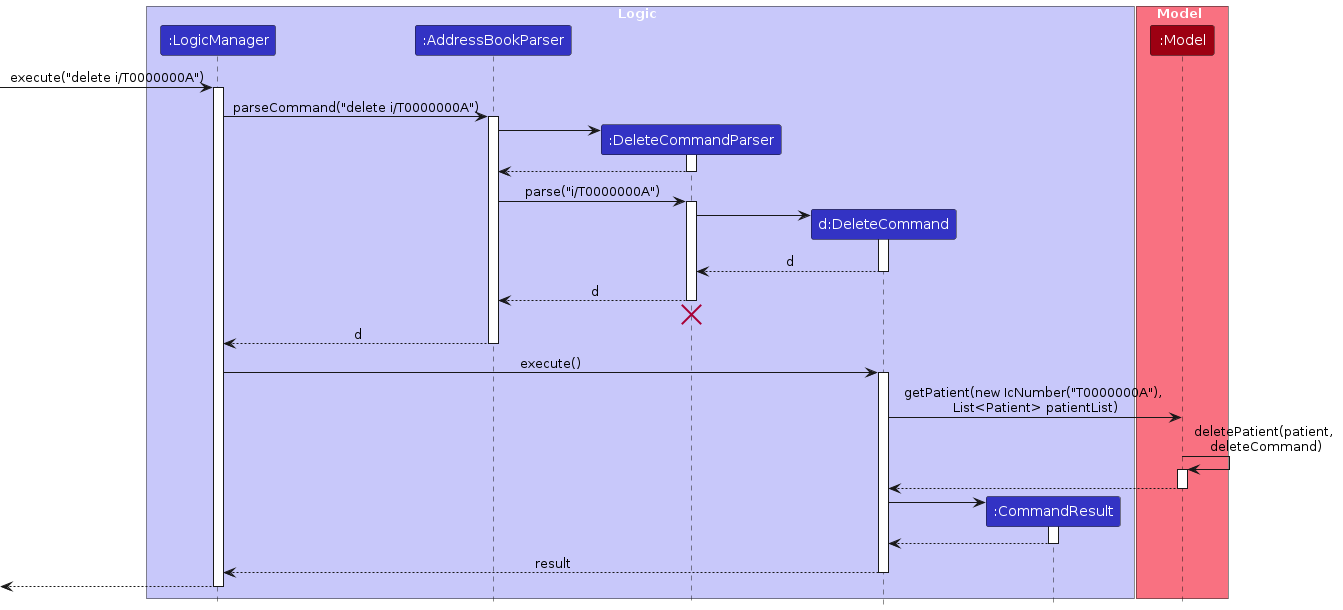
Given below is an example usage scenario and how the mechanism of deleting a patient is performed in Advanced&Efficient.
Step 1. Assuming the application has been launched and the records contain the details of the patient to be deleted,
the user enters the required field which is the IC_NUMBER of the patient intended to be deleted.
For instance, the user wishes to delete the patient whose IC Number is "S1234567A".
The user enters delete i/S1234567A, which is to delete the patient with the corresponding IC Number.
Step 2. LogicManager#execute would call AddressBookParser#parseCommand to parse the user input, splitting the
command word delete and the argument i/S1234567A. After which, the AddressBookParser#parseCommand is called, parsing
the command word and activating DeleteCommandParser to parse the argument
which is the IC number of the patient to be deleted.
Step 3. This DeleteCommandParser#parse method will then be called to parse the argument i/S1234567A
to create an IcNumber object. If the IC number is in an invalid format, a parse exception would be thrown,
giving the user the message on the right expected format of the IC number.
The IcNumber object created is then passed as an argument to instantiate the DeleteCommand.
Step 4. LogicManager#execute will now call DeleteCommand#execute to execute the command. The DeleteCommand#execute
will then call model#getPatient which retrieves the Patient with the matching IC Number as specified by the user.
This Patient object is then passed into the model#deletePatient method to delete the target Patient
from the AddressBook. It then returns a CommandResult stating the patient has
been deleted.
Design considerations:
Aspect: How should users delete a patient from the patient list
- Alternative 1 (current choice): Accept
IC_NUMBERas the argument and use that to iterate through the patient list, search for the patient with the specified IC number and delete it.- Pros: Easy and user-friendly in extremely large databases.
- Cons: Potential pitfalls to consider include methods to search for the IC Number which may return null. This may be dangerous for large scale systems, and as such, other exceptions have to be thrown in place of null as part of defensive programming.
- Alternative 2: Accept indices in place of IC numbers for deleting a patient from the list
- Pros: Easier and neater implementation as out-of-bounds indices of patients are easier to handle compared to a null Patient object which may be introduced in Alternative 1.
- Cons: Not as user-friendly in extremely large databases where it may be very inconvenient to look for the specific patient's index position in the list.
Edit patient feature
Implementation
The edit mechanism is facilitated by EditCommandParser. EditCommandParser parses the user input
and creates the EditCommand. This EditCommand extends Command and is then executed by the LogicManager.
The Command#execute method is then called.
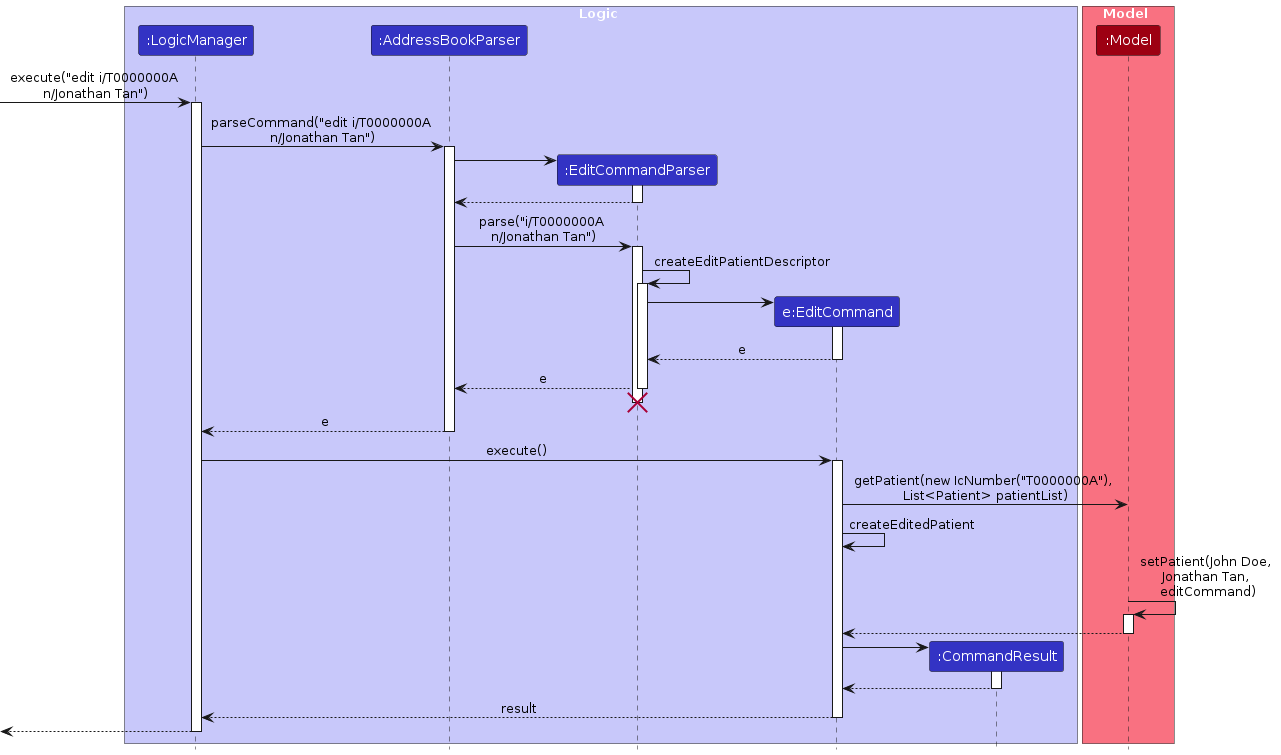
Given below is an example usage scenario and how the mechanism of editing a patient is performed in Advanced&Efficient.
Step 1. Assuming the application has been launched and the records contain the details of the patient to be edited,
the user enters the required field which is the IC_NUMBER and other fields which are to be edited of the target patient.
For instance, the user wishes to edit the patient's name, whose IC Number is "T0000000A".
The user enters edit i/T0000000A n/Jonathan Tan, which is to
edit the name of the patient with the corresponding IC Number from John Doe to Jonathan Tan.
Step 2. LogicManager#execute would call AddressBookParser#parseCommand to parse the user input, splitting the
command word edit and the argument i/T0000000A. After which, the AddressBookParser#parseCommand is called, parsing
the command word and activating EditCommandParser to parse the argument
which is the IC number of the patient to be edited and other fields of the target patient which are to be edited.
Step 3. This EditCommandParser#parse method will then be called to parse the argument i/T0000000A n/Jonathan Tan
to create an IcNumber object. If the IcNumber is in an invalid format, a parse exception would be thrown,
giving the user the message on the right expected format of the IC Number.
In addition, EditCommandParser#parse will invoke EditCommandParser#createEditPatientDescriptor method to
create the edited descriptor of the patient.
The IcNumber object and the patient descriptor is then passed as an argument to instantiate the EditCommand.
Step 4. LogicManager#execute will now call EditCommand#execute to execute the command. The EditCommand#execute
will then call model#getPatient which retrieves the target Patient with the matching IC Number
as specified by the user, in this case the Patient being John Doe.
EditCommand#execute will also call EditCommand#createEditedPatient to create the edited Patient object based on
the patient descriptor created in Step 3, in this case being Jonathan Tan (as the name of the patient was edited).
Step 5. The edited Patient object (Jonathan Tan), along with the
target Patient to be edited (John Doe) from the AddressBook is then passed into the model#setPatient method.
It then returns a CommandResult stating that the patient has been edited.
Design considerations:
Aspect: How should users edit a patient from the patient list
- Alternative 1 (current choice): Create
EditPatientDescriptorto set the patient attributes to their edited values, and create an edited Patient object to replace the target Patient object through theeditcommand.- Pros: Better practice in large codebases through defensive programming, ensuring values of parameters not edited are retained
- Cons: Not as easy to implement as it entails making nested classes for patient descriptors and calling setter methods to make a new edited Patient object
- Alternative 2: Modify the existing Patient object directly
- Pros: Easier to implement as it entails directly calling a Patient constructor that accepts the user input. Therefore it modifies the original Patient object instead of creating a whole new edited Patient object.
- Cons: This may be harmful as the fields that remain unchanged will be overwritten by default values. The alternative would be to input the values of the unchanged fields into the Patient constructor as well, but this will be inefficient, repetitive and not be as user-friendly.
View patient feature
Implementation
The view patient operation is facilitated by ViewCommandParser. ViewCommandParser parses the user input string
and creates the ViewCommand to be executed by the LogicManager. ViewCommand extends Command and implements the
Command#execute method.
Given below is an example usage scenario and how the view patient operation is handled in A&E.
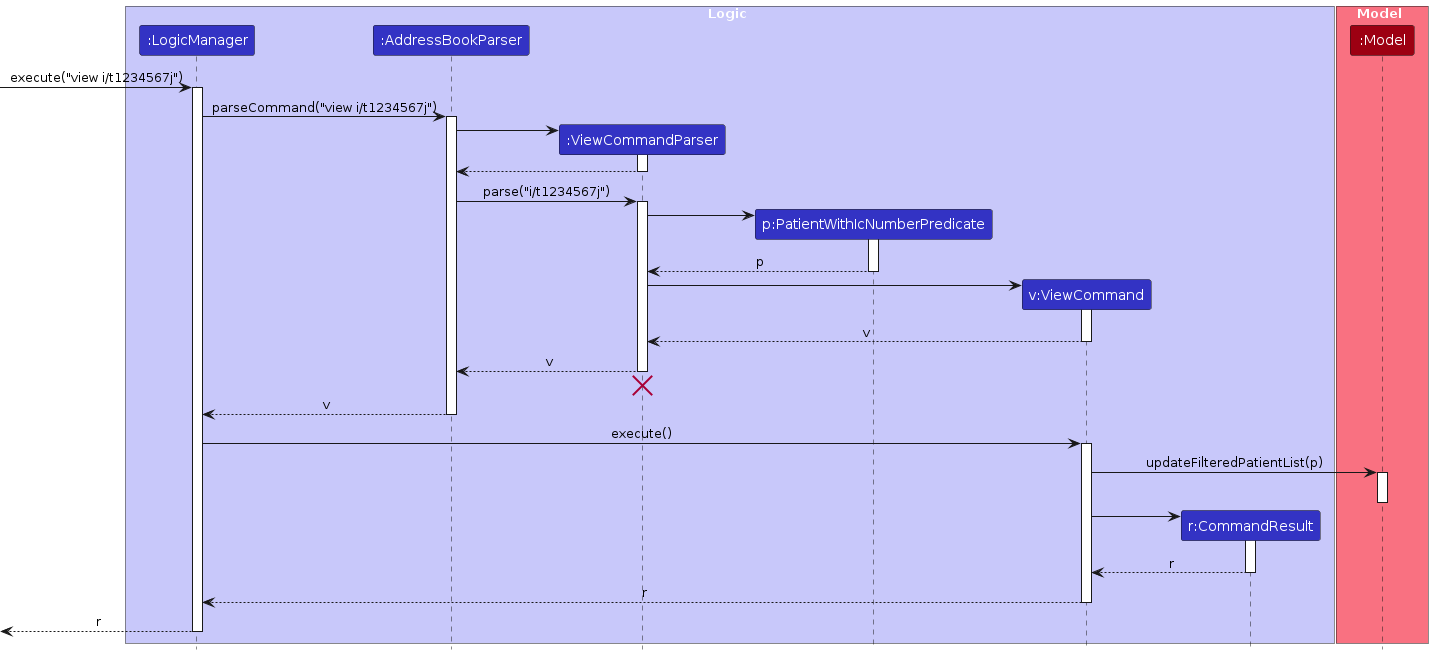
Step 1. Assuming the application has been launched, the user enters view i/t1234567j, which is to find
the specific patient with IC_NUMBER = t1234567j. This invokes LogicManager#execute to execute the logic of the
command.
Step 2. LogicManager#execute would first invoke AddressBookParser#parseCommand which splits the
command word view and the argument i/t1234567j. After splitting, AddressBookParser#parseCommand would identify
that the command is View and instantiate ViewCommandParser and call its ViewCommandParser#parse to parse the
argument accordingly.
Step 3. PatientWithIcNumberPredicate, which checks if a Patient has the IC_NUMBER, is created. It is
then passed as an argument along with IC_NUMBER to instantiate the ViewCommand, which is then returned by
ViewCommandParser#parse.
Step 4. LogicManager#execute now invokes ViewCommand#execute which calls model#updateFilteredPatientList with
PatientWithIcNumberPredicate as an argument. This will update the displayed filter list to the predicate.
It then returns a CommandResult stating the patient has been listed.
Design considerations:
Aspect: How to display the specified patient:
- Alternative 1 (current choice): Utilize current filteredPatientList display to
display the patient.
- Pros: Easy to implement.
- Cons: Similar way in displaying of patient(s) may lead to confusion between commands.
- Alternative 2: Create a new set of JavaFx controls to display that patient differently
from the current filteredPatientList display.
- Pros: New display can be customisable for users' needs.
- Cons: New display have to be implemented correctly to integrate with existing displays.
Edit record feature
Implementation
The edit record operation is facilitated by RecordCommandParser. RecordCommandParser parses the user input string
and creates the RecordCommand to be executed by the LogicManager. RecordCommand extends Command and implements
the Command#execute method.
Given below is an example usage scenario and how the edit record operation is handled in A&E.
Step 1. Assuming the application has been launched, the user enters record i/T0201234A o/Broken Arm di/Hairline fracture tp/Cast for 2 days, which is to edit the record of the specific patient with IC_NUMBER = T0201234A such that
Initial Observations = Broken Arm, Diagnosis = Hairline fracture, and Treatment Plan = Cast for 2 days. This
invokes LogicManager#execute to execute the logic of the command.
Step 2. LogicManager#execute would first invoke AddressBookParser#parseCommand which splits the command word
record and the arguments i/T0201234A, o/Broken Arm, di/Hairline fracture, and tp/Cast for 2 days. After
splitting, AddressBookParser#parseCommand would identify that the command is Record and instantiate
RecordCommandParser and call its RecordCommandParser#parse to parse the arguments accordingly.
Step 3. RecordCommandParser#parse would instantiate EditRecordDescriptor from RecordCommand and map the
IC_NUMBER prefix to its argument T0201234A, the INITIAL_OBSERVATIONS prefix to its argument Broken Arm, the
DIAGNOSIS prefix to its argument Hairline fracture, and the TREATMENT_PLAN prefix to its argument
Cast for 2 days using ArgumentMultimap. The ArgumentMultimap would then be used to identify the IC_NUMBER and a
ParseException is thrown if command inputs are invalid. The ArgumentMultimap also invokes
ArgumentMultimap#isPresent to check if the other prefixes for INITIAL_OBSERVATIONS, DIAGNOSIS and TREATMENT_PLAN
are present. If true is returned, the arguments will be passed into the EditRecordDescriptor object.
The following activity diagram roughly demonstrates how RecordCommand#parse works.
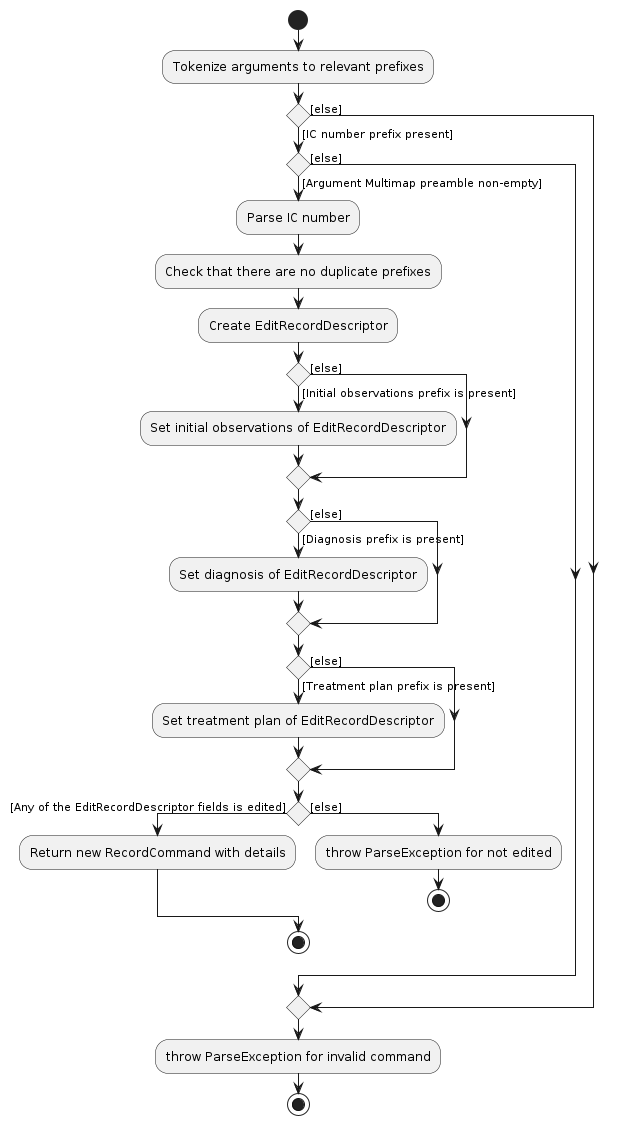
Step 4. The EditRecordDescriptor object calls EditRecordDescriptor#isAnyFieldEdited, which checks if any of the
fields of Record has been edited, and throws a ParseException if false is returned. It is then passed as an argument
along with IC_NUMBER to instantiate the RecordCommand, which is then returned by RecordCommandParser#parse.
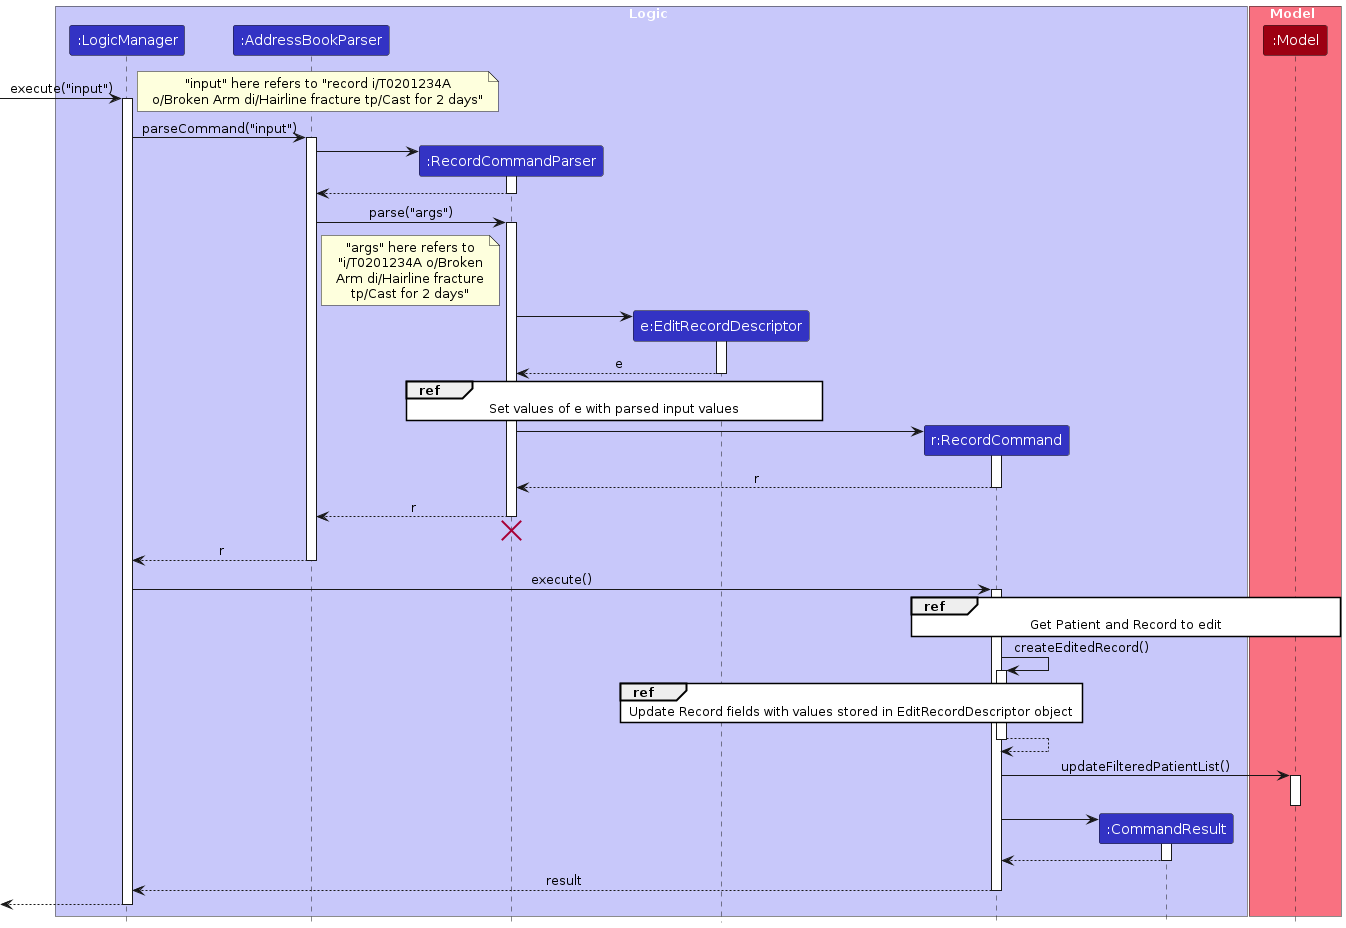
Step 5. LogicManager#execute now invokes RecordCommand#execute which gets the specified Patient and their Record
according to the IC_NUMBER. Then, RecordCommand#createEditedRecord is called with the specified Patient's Record
and the EditRecordDescriptor object which contains the values of fields to be edited. Record fields to be edited are
replaced by values stored in the EditRecordDescriptor. Meanwhile, fields that are not to be edited will keep their
current values. This is facilitated through the orElse method of the Optional class. Then, RecordCommand#execute
calls model#updateFilteredPatientList to update the displayed filter list to show all patients. Finally,
RecordCommand#execute returns a CommandResult stating the patient IC_NUMBER and edited Record details.
The following sequence diagram summarizes the above-mentioned steps.
Design considerations:
Aspect: How to edit the different fields of Record:
- Alternative 1 (current choice): Create
EditRecordDescriptornested class to store the details to edit the patient record with.- Pros: Ensures that previous inputs are kept if user does not edit a specific field.
- Cons: Implementation would be a little more troublesome.
- Alternative 2: Directly use
Patientconstructor with user input and replace non-given fields with default values.- Pros: Easy to implement.
- Cons: This would overwrite all fields in the previous
Recordeven if user did not specify to edit a certain field in their input.
Assign department feature
AssignedDepartment attribute
The AssignedDepartment attribute of a patient in A&E is represented by a stored Department value. Department is
an enumeration that encapsulates all the predefined hospital department values stored by the system and available
to the user. The list of valid departments can be found in the
appendix of the User Guide.
Design considerations:
Aspect: How to represent a department in the system:
- Alternative 1 (current choice): Use Java Enumerations.
- Pros: Ensures type safety. Discrete constants allow for usage in switch-cases, and thus can potentially be used to easily categorize patients in future features.
- Cons: Does not support user-defined categories or departments.
- Alternative 2: Using an abstract Department class and inheritance.
- Pros: Can be made to support user-defined departments. Can specify different behavior for different types of departments.
- Cons: Implementation is more complicated when it comes to storing and keeping track of all the different subclasses or limiting valid department values.
- Alternative 3: Using Strings.
- Pros: Very easy to implement.
- Cons: Values are not exhaustive. Does not support unique behavior for each type of department.
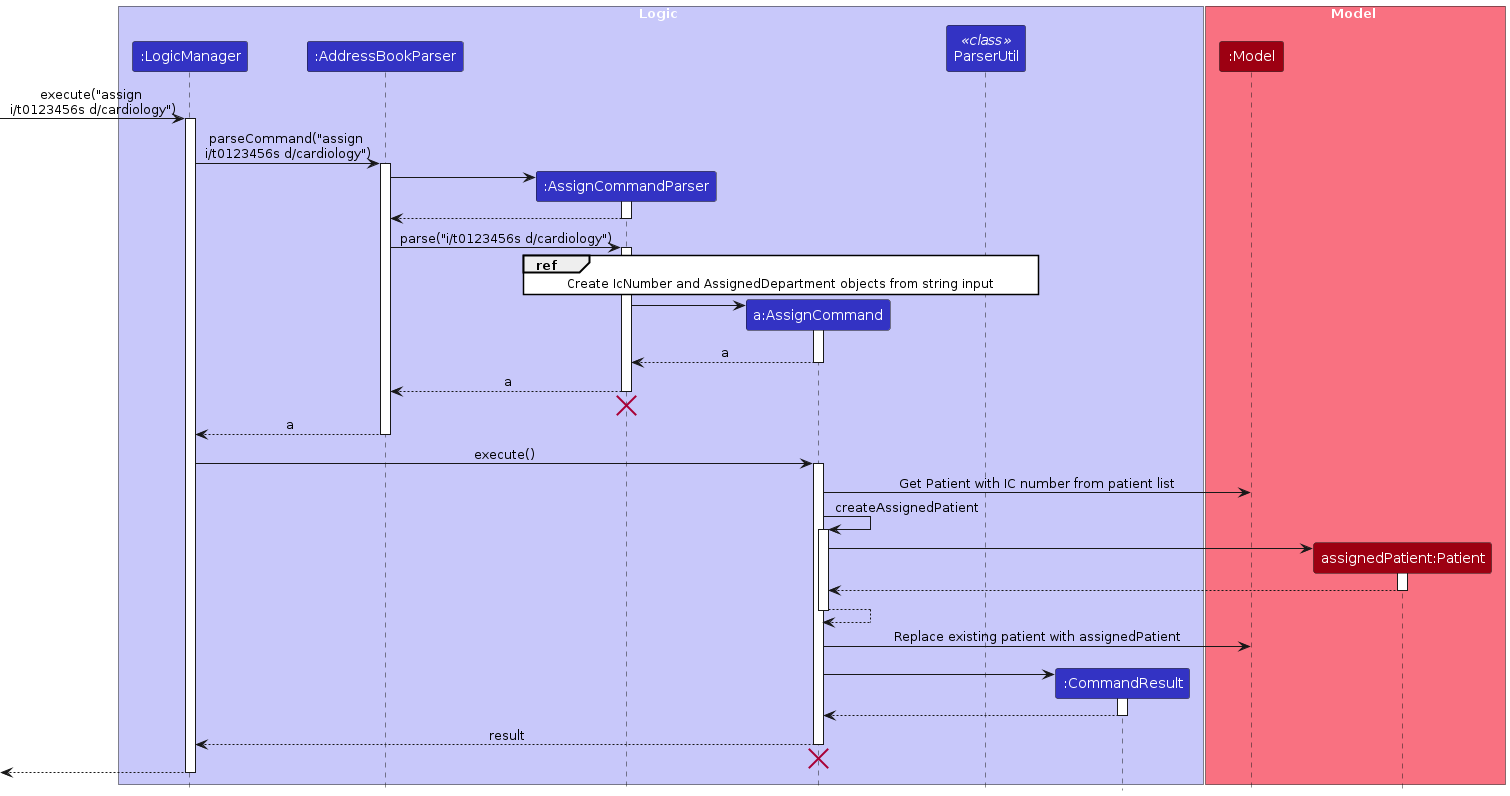
Implementation of assign
The assign department operation is facilitated by the AssignCommand and AssignCommandParser classes, similar
to other commands mentioned above. AssignCommand extends Command and overrides Command#execute to perform
its intended behavior, invoked by the LogicManager class. AssignCommandParser is responsible for parsing the
string of arguments containing an IC_NUMBER and Department inputted by the user, to create an AssignCommand object.
The following sequence diagrams summarize what happens when AssignCommand#execute is invoked.

Sort feature
The sort operation is facilitated by the SortCommand and SortCommandParser classes, similar
to other commands mentioned above. SortCommand extends Command and overrides Command#execute to perform
its intended behavior, invoked by the LogicManager class. SortCommandParser is responsible for parsing the
argument string containing a property inputted by the user, to create a SortCommand object.
Currently, the sort operation sorts the entire patient list, even if the command is executed when the displayed list
is filtered (e.g. using the find command). This choice will be further elaborated on below.
Design considerations:
Aspect: Behavior of sort operation:
- Alternative 1 (current choice): Sort the entire patient list.
- Pros: Easy and quick to implement as it only involves calling Java's
sortmethod on the underlyingUniquePatientListstored inAddressBook. - Cons: Behavior might be unintuitive as when the user runs this command, they might expect this command to only affect the currently displayed list, which might be filtered.
- Pros: Easy and quick to implement as it only involves calling Java's
- Alternative 2: Only sort the currently displayed, or filtered, list.
- Pros: Allows the user to only alter the visible list, and keep the underlying patient list untouched. Behavior is possibly more intuitive.
- Cons: Implementation is more complicated as the
FilteredListthat stores the currently displayed list and is referenced by the UI to display its contents cannot be modified.
Sort order
SortOrder is an enumeration within SortCommand representing the properties by which the user can sort the list.
As of now, the only SortOrders available are the following:
- Name (alphanumerically ascending, case-insensitive)
- IC Number (alphanumerically ascending, case-insensitive)
- Department (by ordinal of constant in
Departmentenumeration) - Age (numerically ascending, with default age on top)
- Priority (descending)
Each SortOrder constant value stores a Comparator<? super Patient> that is used by Java List's build-in sort
method to compare two Patient objects during the execution of the sort command. These comparators make use of the
overridden compareTo methods in the related patient attribute classes (i.e. Name, IcNumber, AssignedDepartment,
Age and Priority). Each SortCommand object stores a SortOrder value, extracted from the input string by the
SortCommandParser object that created it.
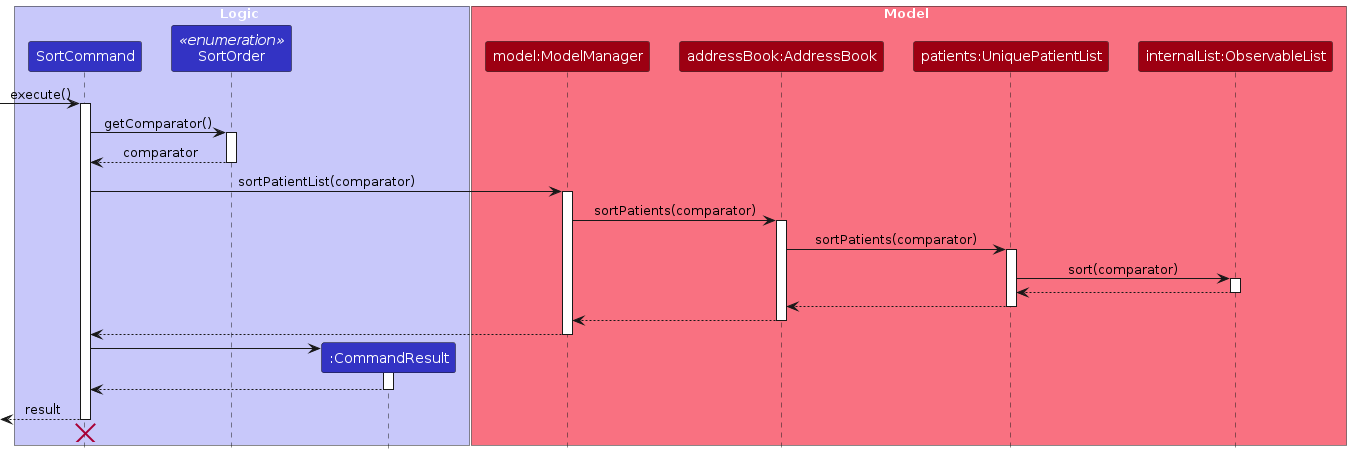
Sequence diagram of SortCommand#execute
As the creation of the SortCommand object is very similar to that of AssignCommand as shown above, except that
it parses the property and uses SortOrder#getSortOrder(String string) to retrieve the SortOrder value, the sequence
diagram below will only show the execution of the SortCommand#execute method to illustrate how the sort feature
works.
Undo/redo feature
Implementation
The undo/redo mechanism is facilitated by VersionedAddressBook. It extends AddressBook with an undo/redo
history, stored internally as an addressBookStateList and currentStatePointer. Additionally, it implements the
following operations:
VersionedAddressBook#commit()— Saves the current address book state in its history.VersionedAddressBook#undo()— Restores the previous address book state from its history.VersionedAddressBook#redo()— Restores a previously undone address book state from its history.
These operations are exposed in the Model interface as Model#commitAddressBook(), Model#undoAddressBook()
and Model#redoAddressBook() respectively.
Given below is an example usage scenario and how the undo/redo mechanism behaves at each step.
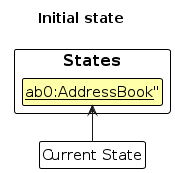
Step 1. The user launches the application for the first time. The VersionedAddressBook will be initialized with the
initial address book state, and the currentStatePointer pointing to that single address book state.
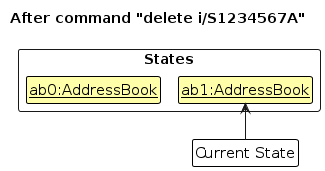
Step 2. The user executes delete i/S1234567A command to delete the patient with IC number "S1234567A" from the address book. The delete command
calls Model#commitAddressBook(), causing the modified state of the address book after the delete i/S1234567A command executes
to be saved in the addressBookStateList, and the currentStatePointer is shifted to the newly inserted address book
state.
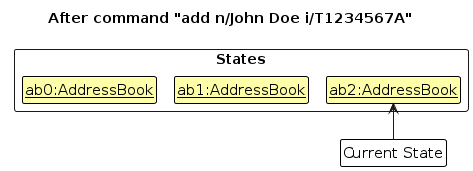
Step 3. The user executes add n/David … to add a new patient. The add command also
calls Model#commitAddressBook(), causing another modified address book state to be saved into
the addressBookStateList.
Note: If a command fails its execution, it will not call Model#commitAddressBook(), so the address book state will
not be saved into the addressBookStateList.
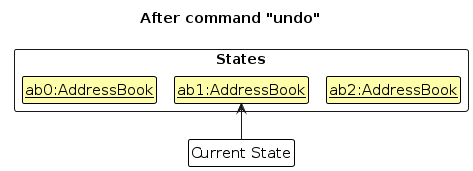
Step 4. The user now decides that adding the patient was a mistake, and decides to undo that action by executing
the undo command. The undo command will call Model#undoAddressBook(), which will shift the currentStatePointer
once to the left, pointing it to the previous address book state, and restores the address book to that state.
Note: If the currentStatePointer is at index 0, pointing to the initial AddressBook state, then there are no
previous AddressBook states to restore. The undo command uses Model#canUndoAddressBook() to check if this is the
case. If so, it will return an error to the user rather
than attempting to perform the undo.
The following sequence diagrams summarise how the undo and redo operations
work respectively when UndoCommand#execute or RedoCommand#execute is invoked:
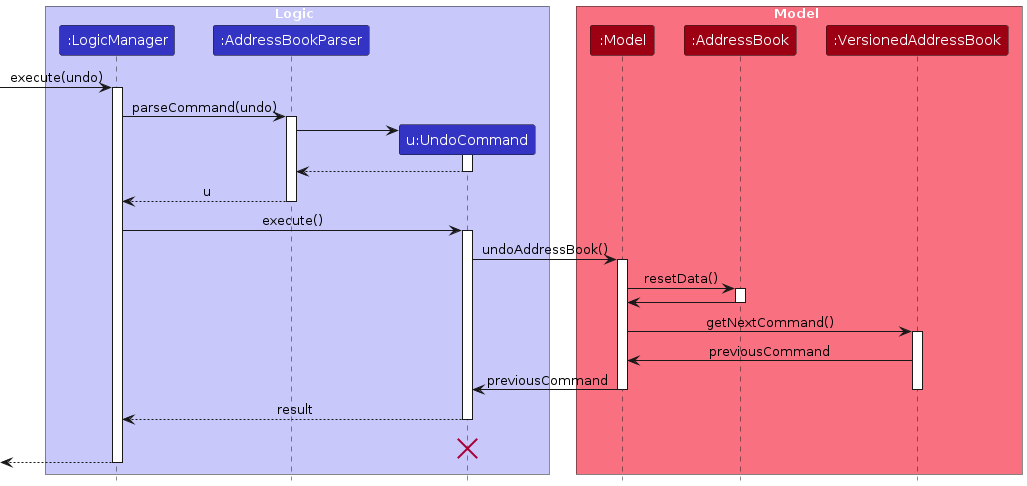

Note: The lifeline for UndoCommand and RedoCommandshould end at the destroy marker (X) but due to a limitation of PlantUML, the
lifeline reaches the end of diagram.
The redo command does the opposite — it calls Model#redoAddressBook(), which shifts the currentStatePointer once
to the right, pointing to the previously undone state, and restores the address book to that state.
Note: If the currentStatePointer is at index addressBookStateList.size() - 1, pointing to the latest address
book state, then there are no undone AddressBook states to restore. The redo command uses Model#canRedoAddressBook()
to check if this is the case. If so, it will return an error to the user rather than attempting to perform the redo.
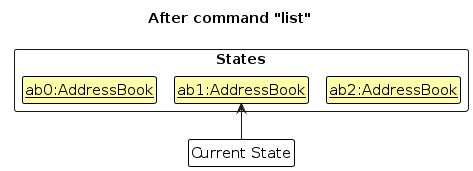
Step 5. The user then decides to execute the command list. Commands that do not modify the address book, such
as list, will usually not call Model#commitAddressBook(), Model#undoAddressBook() or Model#redoAddressBook().
Thus, the addressBookStateList remains unchanged.
Step 6. The user then decides to execute another command, record. Commands such as editing patient record
do not use an inherent method in Model which would modify the state of the addressBook.
For instance, simple commands like edit and add call methods in Model like
Model#setPatient and Model#addPatient respectively, modifying the state of the AddressBook
and committing that state using Model#commitAddressBook. Hence, the undo and redo commands only work for operations
that both modify the addressBook and commit its state.
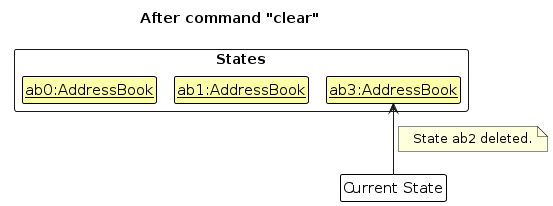
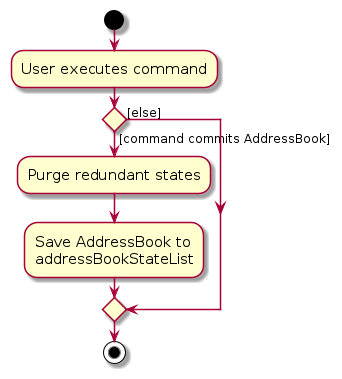
Step 7. The user executes clear, which calls Model#commitAddressBook(). Since the currentStatePointer is not
pointing at the end of the addressBookStateList, all address book states after the currentStatePointer will be
purged. Reason: It no longer makes sense to redo the add n/David … command. This is the behavior that most modern
desktop applications follow.
The following activity diagram summarizes what happens when a user executes a new command:
Design considerations:
Aspect: How undo & redo executes:
- Alternative 1 (current choice): Saves the entire address book.
- Pros: Easy to implement.
- Cons: May have performance issues in terms of memory usage.
- Alternative 2: Individual command knows how to undo/redo by
itself.
- Pros: Will use less memory (e.g. for
delete, just save the patient being deleted). - Cons: We must ensure that the implementation of each individual command are correct.
- Pros: Will use less memory (e.g. for
Data archiving
The data archiving feature in Advanced&Efficient is designed to ensure that historical patient records are maintained in a safe, accessible, and organized manner. This feature is crucial for historical reference and data analysis.
Implementation Strategy
- Archive Format: Patient records will be archived in a compressed JSON format to save space and maintain data confidentiality.
- Trigger and Storage: Archiving will be triggered automatically. The system will automatically update the JSON file (
AandE.json) when user modify any patient or record.
Example of archived file
An archived file (AandE.json) is represented in JSON as follows:
{
  "patients" : [ {
    "name" : "John Doe",
    "phone" : "00000000",
    "email" : "default_email@gmail.com",
    "gender" : "MALE",
    "icNumber" : "T0123456A",
    "birthday" : "01/01/1990",
    "address" : "No address was added",
    "priority" : "NIL",
    "assignedDepartment" : "Default",
    "tags" : [ ],
    "initialObservations" : "No initial observations given",
    "diagnosis" : "No diagnosis given",
    "treatmentPlan" : "No treatment plan given"
  }]
}
- patient: This field contains the details of the patient associated with the record. The format for a patient is as described in the earlier sections of this guide.
- initialObservations: A string that stores the initial observations made by the medical professional when the patient was examined.
- diagnosis: A string that details the medical diagnosis after thorough examination.
- treatmentPlan: The recommended treatment plan for the diagnosed ailment.
It's worth noting that the default values for initialObservations, diagnosis, and treatmentPlan are set to
represent that no data was provided. This allows for the record to be initialized even if not all fields are populated
initially.
Documentation, logging, testing, configuration, dev-ops
Appendix: Requirements
Product scope
Target user profile:
- has to log patient records into the system
- has to assign patients to the relevant departments
- has to work under time pressure during an emergency
- faces frequent interruption due to emergencies
- has an above average typing speed
- prefers typing over mouse/voice commands
- is comfortable using CLI apps
Value proposition: Advanced&Efficient helps Emergency Department (ED) doctors in logging patient reports and assigning patients to relevant departments under time pressure during an emergency, using the CLI.
User stories
Priorities: High (must have) - * * *, Medium (nice to have) - * *, Low (unlikely to have) - *
| Priority | As a … | I want to … | So that I can… |
|---|---|---|---|
* * * | ED Doctor | View the record of a patient | Keep track of every patient’s condition and treatment plan |
* * * | ED Doctor | Assign a patient to a department | Keep track of where each patient is receiving further treatment |
* * * | ED Doctor | Edit the existing record of a patient | Keep the patient’s record relevant and up-to-date |
* * * | ED Doctor | Delete a patient from my list | Declutter and only keep the active patients on my list |
* * * | ED Doctor | Add a patient to the list | - |
* * * | ED Doctor | View the list of patients | - |
* * | ED Doctor | Undo my latest action | Quickly revert a mistake I made |
* * | ED Doctor | Redo my latest action | Quickly redo any change I may have wrongly undone |
* * | ED Doctor | Tag patients | Better organize patients into categories so as to better keep track of them |
* * | ED Doctor | Assign the priority to the patient with respect to the severity of the case | Keep track of the more critical cases |
* * | ED Doctor | Find patients from the list that match a given property (e.g. NAME, IC_NUMBER, PRIORITY) | Quickly narrow down the list to view the patients of my interest |
* | ED Doctor | Quickly view the availability status of a doctor | Assign them patients |
* | ED Doctor | Message and communicate with other healthcare staff | Coordinate patient care effectively |
* | ED Doctor | Sort my list of active patients by priority/severity | Provide timely treatment to the patients in critical condition |
* | ED Doctor | Retrieve the patient’s medical history from the national database after logging them in the system | Gather more information to make a more informed diagnosis and as such provide effective treatment for the patient |
* | ED Doctor | Customize shortcuts for my most commonly-used commands | Make my workflow more efficient and convenient |
* | ED Doctor | Backup the data in my app | Ensure that all the patient information is not completely lost in the event that the data file gets corrupted or the computer’s hardware malfunctions |
* | ED Doctor | Login into the system only using hospital credentials | Ensure the confidentiality and security of patient information and limit its access to hospital personnel only |
* | ED Doctor | Securely send a patient’s records to the relevant department | Ensure that the other department I am handing my patient to is on the same page as to/updated on the current condition of the patient |
* | ED Doctor | Access clinical guidelines and resources within the application | Diagnose and treat patients with greater ease |
* | ED Doctor | View real-time vitals of patients | Monitor patient’s condition efficiently |
* | ED Doctor | Receive notifications for critical situations | Provide timely intervention and efficiently handle critical patient conditions |
* | ED Doctor | Save a draft of a message I am writing into the local repository | Return to work on it after an emergency call |
* | ED Doctor | Filter a list of doctors according to their department | Easily identify doctors to assign to from a specific department |
* | ED Doctor | View the list of doctors | Know who I can refer my patients for further treatment to |
* | ED Doctor | View a list of commands | Know the commands needed to carry out my action |
Use cases
(For all use cases below, the System is the Advanced&Efficientapplication and the Actor is the ED doctor,
unless specified otherwise)
Use case: UC01 - View list of patients
MSS
ED doctor requests to view list of all patients.
Advanced&Efficient shows a list of all patients.
Use case ends.
Use case: UC02 - Add a patient
Guarantees
- Patient added will not have same name or IC number as any existing patients.
MSS
ED doctor requests to add a new patient with given details.
Advanced&Efficient adds the patient to the system.
Use case ends.
Extensions
1a. Advanced&Efficient detects that not all required details are given.
1a1. Advanced&Efficient shows an error message saying that not all required details are given.
1a2. Advanced&Efficient requests for all the required details.
1a3. ED doctor enters the required details.
Steps 1a1-1a3 are repeated until all the required details are given.
Use case resumes from step 2.
1b. Advanced&Efficient detects that the given details are invalid.
1b1. Advanced&Efficient shows an error message saying the given details are invalid.
1b2. Advanced&Efficient requests for valid details.
1b3. ED doctor enters the requested details.
Steps 1b1-1b3 are repeated until the details are valid.
Use case resumes from step 2.
1c. Advanced&Efficient detects that the given patient is already in the system.
1c1. Advanced&Efficient shows an error message saying patient already exist.
Use case ends.
Use case: UC03 - View a patient's details
MSS
ED doctor requests to view a patient’s details by their IC number.
Advanced&Efficient shows the patient’s details.
Use case ends.
Extensions
1a. Advanced&Efficient detects that the given IC number is invalid.
1a1. Advanced&Efficient shows an error message saying the given IC number is invalid.
1a2. Advanced&Efficient requests for valid IC number.
1a3. ED doctor enters the IC number.
Steps 1a1-1a3 are repeated until the IC number is valid.
Use case resumes from step 2.
1b. Advanced&Efficient detects that the specified patient does not exist.
1b1. Advanced&Efficient shows message saying the patient does not exist.
Use case ends.
Use case: UC04 - Edit a patient's details
MSS
ED doctor requests to edit a patient’s details by their IC number.
Advanced&Efficient edits the patient’s details as specified.
Use case ends.
Extensions
1a. Advanced&Efficient detects that the given IC number is invalid.
1a1. Advanced&Efficient shows an error message saying the given IC number is invalid.
1a2. Advanced&Efficient requests for valid IC number.
1a3. ED doctor enters the IC number.
Steps 1a1-1a3 are repeated until the IC number is valid.
Use case resumes from step 2.
1b. Advanced&Efficient detects that the specified patient does not exist.
1b1. Advanced&Efficient shows message saying the patient does not exist.
Use case ends.
1c. Advanced&Efficient detects that the given details are invalid.
1c1. Advanced&Efficient shows an error message saying the given details are invalid.
1c2. Advanced&Efficient requests for valid details.
1c3. ED doctor enters the requested details.
Steps 1c1-1c3 are repeated until the details are valid.
Use case resumes from step 2.
Use case: UC05 - Delete a patient
MSS
ED doctor requests to delete a patient by their IC number.
Advanced&Efficient deletes the patient from the system.
Use case ends.
Extensions
1a. Advanced&Efficient detects that the given IC number is invalid.
1a1. Advanced&Efficient shows an error message saying the given IC number is invalid.
1a2. Advanced&Efficient requests for valid IC number.
1a3. ED doctor enters the IC number.
Steps 1a1-1a3 are repeated until the IC number is valid.
Use case resumes from step 2.
1b. Advanced&Efficient detects that the specified patient does not exist.
1b1. Advanced&Efficient shows message saying the patient does not exist.
Use case ends.
Use case: UC06 - Find patient(s) by name
MSS
ED doctor requests to find patient(s) by name.
Advanced&Efficient shows a filtered list of matching patient(s).
Use case ends.
Use case: UC07 - Sort a patient list
MSS
ED doctor requests to sort a patient list by a property.
Advanced&Efficient shows the list of sorted patients.
Use case ends.
Extensions
- 1a. Advanced&Efficient detects that the given property is invalid.
1a1. Advanced&Efficient shows an error message saying the given property is invalid.
1a2. Advanced&Efficient requests for valid property.
1a3. ED doctor enters the property.
Steps 1a1-1a3 are repeated until the property is valid.
Use case resumes from step 2.
Use case: UC08 - Edit a patient's record
MSS
ED doctor requests to edit a patient’s record by their IC number.
Advanced&Efficient edits the patient’s record as specified.
Use case ends.
Extensions
1a. Advanced&Efficient detects that the given IC number is invalid.
1a1. Advanced&Efficient shows an error message saying the given IC number is invalid.
1a2. Advanced&Efficient requests for valid IC number.
1a3. ED doctor enters the IC number.
Steps 1a1-1a3 are repeated until the IC number is valid.
Use case resumes from step 2.
1b. Advanced&Efficient detects that the specified patient does not exist.
1b1. Advanced&Efficient shows message saying the patient does not exist.
Use case ends.
1c. Advanced&Efficient detects that the given record details are invalid.
1c1. Advanced&Efficient shows an error message saying the given record details are invalid.
1c2. Advanced&Efficient requests for valid record details.
1c3. ED doctor enters the record details.
Steps 1c1-1c3 are repeated until the record details are valid.
Use case resumes from step 2.
Use case: UC09 - Assign a patient to department
MSS
ED doctor requests to assign a patient to a department by their IC number.
Advanced&Efficient assigns the patient to the department.
Use case ends.
Extensions
1a. Advanced&Efficient detects that the given IC number is invalid.
1a1. Advanced&Efficient shows an error message saying the given IC number is invalid.
1a2. Advanced&Efficient requests for valid IC number.
1a3. ED doctor enters the IC number.
Steps 1a1-1a3 are repeated until the IC number is valid.
Use case resumes from step 2.
1b. Advanced&Efficient detects that the specified patient does not exist.
1b1. Advanced&Efficient shows message saying the patient does not exist.
Use case ends.
1c. Advanced&Efficient detects that the given department is invalid.
1c1. Advanced&Efficient shows an error message saying the given department is invalid.
1c2. Advanced&Efficient requests for valid department.
1c3. ED doctor enters the department.
Steps 1c1-1c3 are repeated until the department is valid.
Use case resumes from step 2.
Use case: UC10 - Undoing a command
MSS
ED doctor requests to undo the previous command.
Advanced&Efficient undos the previous command.
Use case ends.
Extensions
- 1a. Advanced&Efficient detects that there are no previous commands to undo.
1a1. Advanced&Efficient shows an error message saying that there are no previous commands to undo.
Use case ends.
Non-Functional Requirements
- Should work on any mainstream OS as long as it has Java
11or above installed. - Should be able to hold up to 1000 patients without a noticeable sluggishness in performance for typical usage.
- An ED doctor with above average typing speed for regular English text should be able to accomplish most of the tasks faster using commands than using the mouse.
- Should not lose any data if the application is closed by any other means besides the
Exitcommand. - The response to any user action should be visible within 2 seconds.
Glossary
- Mainstream OS: Windows, Linux, Unix, OS-X
- Department: A sector of the hospital responsible for a type of healthcare treatment.
Appendix: Instructions for manual testing
Given below are instructions to test the app manually.
Note: These instructions only provide a starting point for testers to work on; Testers are expected to do more exploratory testing.
Launch and shutdown
Initial launch
Download the jar file and copy into an empty folder
Double-click the jar file.
Expected: Shows the GUI with a set of sample contacts. The window size may not be optimal.
Saving window preferences
Resize the window to an optimal size. Move the window to a different location. Close the window.
Re-launch the app by double-clicking the jar file.
Expected: The most recent window size and location is retained.
Adding a patient
Adding a patient with only required prefixes
Prerequisites: None of existing patients have either name
You Wen Tiand/or IC numberT0374628Z. (else you may replace the name and/or IC number specified in the test cases)Test case:
add n/You Wen Ti i/T0374628Z
Expected: Patient with nameYou Wen Tiand IC numberT0374628Zis added. Details of the added patient is shown in the status message. UI is updated to display newly added patient.Test case:
add n/Wo Meiyou
Expected: No patient is added. Error details shown in the status message. Patient list remains the same.Other incorrect add commands to try:
add,add Wo Meiyou T0365867F
Expected: Similar to the previous case.
Adding a patient with both required and optional prefixes
Prerequisites: None of existing patients have either name
Ingot Goldor IC numberT0482756J. (else you may replace the name and/or IC number specified in the test cases)Test case:
add n/Ingot Gold i/T0482756J g/MALE b/20/05/2004 p/87654487 e/goldie@email.com a/Old Town Road 1 pr/HIGH t/critical
Expected: Patient with nameIngot Gold, IC numberT0482756J, genderMALE, birthday20/05/2004, phone number87654487, emailgoldie@email.com, addressOld Town Road 1, priorityHIGH, and tagcriticalis added. Details of the added patient is shown in the status message. UI is updated to display newly added patient.Test case:
add n/Betty Crocker i/T0826789S a/Downtown East a/Lowcoast West
Expected: No patient is added. Error details shown in the status message. Patient list remains the same.Other incorrect add commands to try:
add,add n/Beckham Low pr/high
Expected: Similar to the previous case.
Viewing a patient
Viewing a patient
Prerequisites: Have our sample patient list loaded OR add a patient with IC number
T7654321A.Test case:
view i/T7654321A
Expected: Patient with IC numberT7654321Awill be displayed in patient list. Details of success of command is shown in the status message. Patient list is updated in UI.Test case:
view I/T7654321A
Expected: No patient is viewed. Error details shown in the status message. Patient list remains the same.Other incorrect view commands to try:
view,view i/T8374829X(where a patient with ic numberT8374829Xdoes not exist)
Expected: Similar to the previous case.
Deleting a patient
Deleting a patient
Prerequisites: Have our sample patient list loaded OR add a patient with IC number
T7654321A.Test case:
delete i/T7654321A
Expected: Patient with IC numberT7654321Ais deleted. Details of the deleted patient is shown in the status message. Patient list is updated in UI.Test case:
delete I/T7654321A
Expected: No patient is deleted. Error details shown in the status message. Patient list remains the same.Other incorrect delete commands to try:
delete,delete i/T9384758D(where a patient with IC numberT9384758Ddoes not exist)
Expected: Similar to the previous case.
Editing a patient
Editing a patient's details
Prerequisites: Have our sample patient list loaded OR add a patient with IC number
T7654321A.Test case:
edit i/T7654321A n/John Doe
Expected: Patient with IC numberT7654321Awill have their name edited toJohn Doe. Details of the edited patient is shown in the status message. UI is updated to display patient's new details.Test case:
edit i/T7654321A
Expected: No patient is edited. Error details shown in the status message. Patient's details remains the same.Other incorrect edit commands to try:
edit,edit i/T0264782A n/Mary Jane(where a patient with IC numberT0264782Adoes not exist)
Expected: Similar to the previous case.
Editing a patient record
Editing a patient's record
Prerequisites: Have our sample patient list loaded OR add a patient with IC number
T7654321A.Test case:
record i/T7654321A o/Coughing for 3 weeks di/Acute Bronchitis tp/Take Medicine
Expected: Record of the patient with IC numberT7654321Ais edited to haveBroken Armas initial observation,Hairline fractureas diagnosis, andCast for 2 daysas treatment plan. Details of the edited record is shown in the status message. Patient's record is updated in UI.Test case:
record i/T7654321A
Expected: No patient record is edited. Error details shown in the status message. Patient's record remains the same.Other incorrect delete commands to try:
record,record i/T7654321A o/Broken Pinky o/Dizziness,record i/T2736487A di/Asthma(where patient with IC numberT2736487Adoes not exist)
Expected: Similar to the previous case.
Assigning a patient to a department
Assigning a patient to a department
Prerequisites: Have our sample patient list loaded OR add a patient with IC number
T7654321A.Test case:
assign i/T7654321A d/cardiology
Expected: Patient IC numberT7654321Ais assigned to departmentCardiology. Details of the assigned department is shown in the status message. Patient's assigned department is updated in UI.Test case:
assign i/T7654321A
Expected: Patient is not assigned a department. Error details shown in the status message. Patient's assigned department remains the same.Other incorrect assign commands to try:
assign,assign i/T7654321A d/Cardio(department is not fully spelt),assign i/T7654321A d/Anesthesiology(department follows American spelling)
Expected: Similar to the previous case.
Sorting patients
Sorting patients by name
Prerequisites: List all patients using the
listcommand. Multiple patients in the list.Test case:
sort name
Expected: Patient list is sorted according tonamein alphanumeric order. Details of success of command is shown in the status message. Order of patients in list is updated in UI.Test case:
sort
Expected: Patient list is not sorted. Error details shown in the status message. Patient list remains the same.
Sorting patients by IC number
Prerequisites: List all patients using the
listcommand. Multiple patients in the list.Test case:
sort ic
Expected: Patient list is sorted according toIC number, in alphanumeric order. Details of success of command is shown in the status message. Order of patients in list is updated in UI.
Sorting patients by assigned department
Prerequisites: List all patients using the
listcommand. Multiple patients in the list. At least 2 different assigned departments among all patients in the list.Test case:
sort department
Expected: Patient list is sorted according toassigned department, where patients with default departments are placed at the bottom. Details of success of command is shown in the status message. Order of patients in list is updated in UI.
Sorting patients by age
Prerequisites: List all patients using the
listcommand. Multiple patients in the list. At least 2 different ages (i.e. birth years in birthdays) among all patients in the list.Test case:
sort age
Expected: Patient list is sorted according toage, where patients with default birthdays/ages are placed on top, followed by the remaining ages in increasing order. Details of success of command is shown in the status message. Order of patients in list is updated in UI.
Sorting patients by priority
Prerequisites: List all patients using the
listcommand. Multiple patients in the list. At least 2 different priorities among all patients in the list.Test case:
sort priority
Expected: Patient list is sorted according to descendingpriority. Details of success of command is shown in the status message. Order of patients in list is updated in UI.
Undoing and Redoing a command
Undoing and Redoing add command
Prerequisites: Have no patient with name
Shen Qi Fengand/or IC numberS0473859Din the patient list. (else you may replace the name and/or IC number specified in the test cases)Test case:
add n/Shen Qi Feng i/S0473859Dthenundo
Expected: Patient with nameShen Qi Fengand IC numberS0473859Dis added, then removed. Details of success of command is shown in the status message. Patient list remains the same in UI after both commands are executed.Test case:
redo(after executing the previous test case)
Expected: Patient with nameShen Qi Fengand IC numberS0473859Dis added back. Details of success of command is shown in the status message. Patient list is updated in UI.
Undoing and Redoing edit command
Prerequisites: Have our sample patient list loaded OR add a patient with IC number
T7654321A. Patient to be edited should have a different address fromDummy Address Test Street 1.Test case:
edit i/T7654321A a/Dummy Address Test Street 1thenundoExpected: Address of patient with IC numberT7654321Ais changed toDummy Address Test Street 1, then changed back to initial address. Details of success of command is shown in the status message. Patient list remains the same in UI after both commands are executed.Test case:
redo(after executing the previous test case)
Expected: Address of patient with IC numberT7654321Ais changed back toDummy Address Test Street 1. Details of success of command is shown in the status message. Patient's details is updated in UI.
Undoing and Redoing delete command
Prerequisites: Have our sample patient list loaded OR add a patient with IC number
T6789031Q.Test case:
delete i/T6789031Qthenundo
Expected: Patient with IC numberT6789031Qis deleted, then added back. Details of success of command is shown in the status message. Patient list remains the same in UI after both commands are executed.Test case:
redo(after executing the previous test case)
Expected: Patient with IC numberT6789031Qis deleted again. Details of success of command is shown in the status message. Patient list is updated in UI.
Undoing and Redoing assign command
Prerequisites: Have our sample patient list loaded OR add a patient with IC number
T7654321A. Assigned department of patient with IC numberT7654321Ashould not beEndocrinology.Test case:
assign i/T7654321A d/Endocrinologythenundo
Expected: Patient with IC numberT7654321Ais assigned to departmentEndocrinology, then assigned back to initial department. Details of success of command is shown in the status message. Patient list remains the same in UI after both commands are executed.Test case:
redo(after executing the previous test case)
Expected: Patient with IC numberT7654321Ais assigned back to departmentEndocrinology. Details of success of command is shown in the status message. Patient's assigned department is updated in UI.
Undoing and Redoing clear command
Prerequisites: Have at least one patient in the system.
Test case:
clearthenundo
Expected: Patient list is cleared, then restored. Details of success of command is shown in the status message. Patient list remains the same in UI after both commands are executed.Test case:
redo(after executing the previous test case)
Expected: Patient list is cleared again. Details of success of command is shown in the status message. UI is updated to display an empty patient list.
Appendix: Planned Enhancements
Currently, when
Viewcommand is executed, it only shows thatPatientin the display panel instead of their details and record in the record panel. Users would have to click thatPatientagain to display their record. SinceIC_NUMBERis unique for everyPatient, we plan to show thePatientdetails and record directly in the information tab.Currently, the
undoandredocommand do not work as expected forrecordcommand which is meant for editing patient record.recordcommand modifies the state of the AddressBook. However, it does not commit the modified state of the AddressBook. As such, this new state of the AddressBook is not stored in the addressBookStateList which contains all the states of the addressBook. Hence, modifications will be made to commands likerecordto ensure all modified states of the AddressBook are committed and stored properly. Hence,undoandredowill work on any operation which modifies the AddressBook.Since our project is adapted from the AddressBook3 project by SE-EDU initiative, there are multiple usage of
AddressBookterms in our namings of methods and files. We plan to completely refactor all instances ofAddressBookintoPatientRecordSystem. For example,AddressBookParser.javawould be renamed toPatientRecordSystemParser.java.Currently, age is not displayed in a patient's record card in the record panel, but only the patient card in the patient list panel in the UI. This is inconsistent and might make it inconvenient for users to have to look back to the patient card for this crucial piece of patient information. We plan to include it as a label in every patient's record card subsequently.
Invalid parameters/prefixes currently cannot be detected properly by the program. For example, if the user inputs
add n/John Doe i/T0123456S bt/O+to try to add a patient with name "John Doe", IC number "T0123456S" and blood type "O+", the program will display the error message "IC Number should start and end with an alphabet with non negative numbers in between" instead of indicating that the prefixbt/does not exist. We plan to modify parsing-related classes (e.g.ArgumentTokenizer) so that extraneous or invalid prefixes can be detected in the future.Invalid dates can currently be added as birthdays for patients (e.g. 30 February). This is an issue trickled down from Java's
LocalDate, which does not appear to have built-in checks for invalid dates like these. We plan on enhancing ourBirthdayclass by manually adding checks inisValidBirthdayto detect invalid dates.Currently, any alphabet is accepted for the start of an IC number. Ideally, only letters "S", "T", "F", "G" or "M" are accepted for the start of an IC number. Therefore, we plan on enhancing our
IcNumberclass by manually adding checks to ensure the first alphabet of an IC number is valid.
Currently, a patient having too many tags or tags that are too long will cause their tags in the UI to overflow and overlap with other UI elements, causing their patient card in the patient list to be unreadable. Therefore, we plan on adjusting the UI component containing these tags so that tags are only allowed to take up a certain amount of space in the UI and are truncated otherwise.
Currently, the
Recordcommand cannot be undone, which might be unintuitive to users as it updates the field of a patient's record, and users will find it helpful to be able to undo a command like this. We plan on modifying theRecordCommandclass to support theundobehavior in the future.