
Advanced&Efficient (A&E) User Guide
Welcome to Advanced&Efficient (A&E)!
Advanced&Efficient (A&E) is a powerful desktop application designed specifically for Emergency Department (ED) doctors who need to create, update, and manage patients and their records swiftly and effectively. This application, with its Command-Line Interface (CLI)1 design, caters to fast typists and professionals who prefer typing over mouse interactions, significantly speeding up the process of inputting and managing patient data.
Here’s a sneak peek into what A&E offers:
- Streamlined logging of patient reports in a user-friendly CLI environment
- Quick connections to relevant hospital departments for patient referrals
- A comprehensive suite of commands for adding, viewing, editing, and deleting patient records
- An intuitive system for managing patient priority levels and medical tags
- Easy-to-follow command summaries and guides for efficient navigation
A&E combines the simplicity of a CLI with the visual cues of a Graphical User Interface (GUI)2, offering you the best of both worlds. If you're comfortable with typing and looking for speed and efficiency in patient management, A&E is tailored just for you.
This User Guide is designed to help you, whether you're a newcomer or an experienced user, to harness the full potential of A&E. Here, you'll find everything you need to streamline your patient management tasks, making your role in the ED more manageable and effective.
Embrace the efficiency of A&E and transform the way you manage patient records in your Emergency Department. Let’s get started!
Table of Contents
- Table of Contents
- Using This Guide
- Quick Start
- Getting to Know A&E
- Features
- Prefix Summary
- Viewing help :
help - Listing all patients:
list - Adding a patient:
add - Viewing a patient :
view - Editing a patient:
edit - Deleting a patient:
delete - Finding a patient by name :
find - Sorting the patient list :
sort - Editing a patient record :
record - Assigning a patient to a department :
assign - Undoing a command :
undo - Redoing a command :
redo - Clearing all entries :
clear - Exiting the program :
exit - Saving the program
- Editing the data file
- FAQ
- Known Issues
- Command Summary
- Glossary
- Appendix : Departments
Using This Guide
This user guide contains all of the information you will need in order to use A&E.
For new users:
- Begin your journey with A&E by exploring the Quick Start and Getting to Know A&E sections.
For experienced users:
- Utilize the Table of Contents to swiftly navigate to your desired section.
- Dive into the Features to explore advanced functionalities and optimize your workflow.
Before you delve further into this guide, do take note of the following highlighted information panels.
Note: Used to highlight information you should pay attention to
Tip: Used to highlight tips which you might find useful
Caution: Used to highlight issues to look out for
Quick Start
- Ensure you have Java 113 or above installed in your Computer.
How to check?
- Open up the Terminal on your computer.
i. For Windows users, locate it by typing in “Terminal” in the search bar.
ii. For Mac users, locate it by typing in “Terminal” in Spotlight. - Type in
java -versionand press Enter. - If you have Java installed, you should see your Java version as shown underlined in the picture below.

- If you do not have Java or your Java version is below 11, install Java 11 here based on your Operating System.
Go to your Desktop and create a folder named “AAndE”.
Download Advanced&Efficient here
i. After clicking on the link, click onAdvancedAndEfficient.jaras seen in the picture below.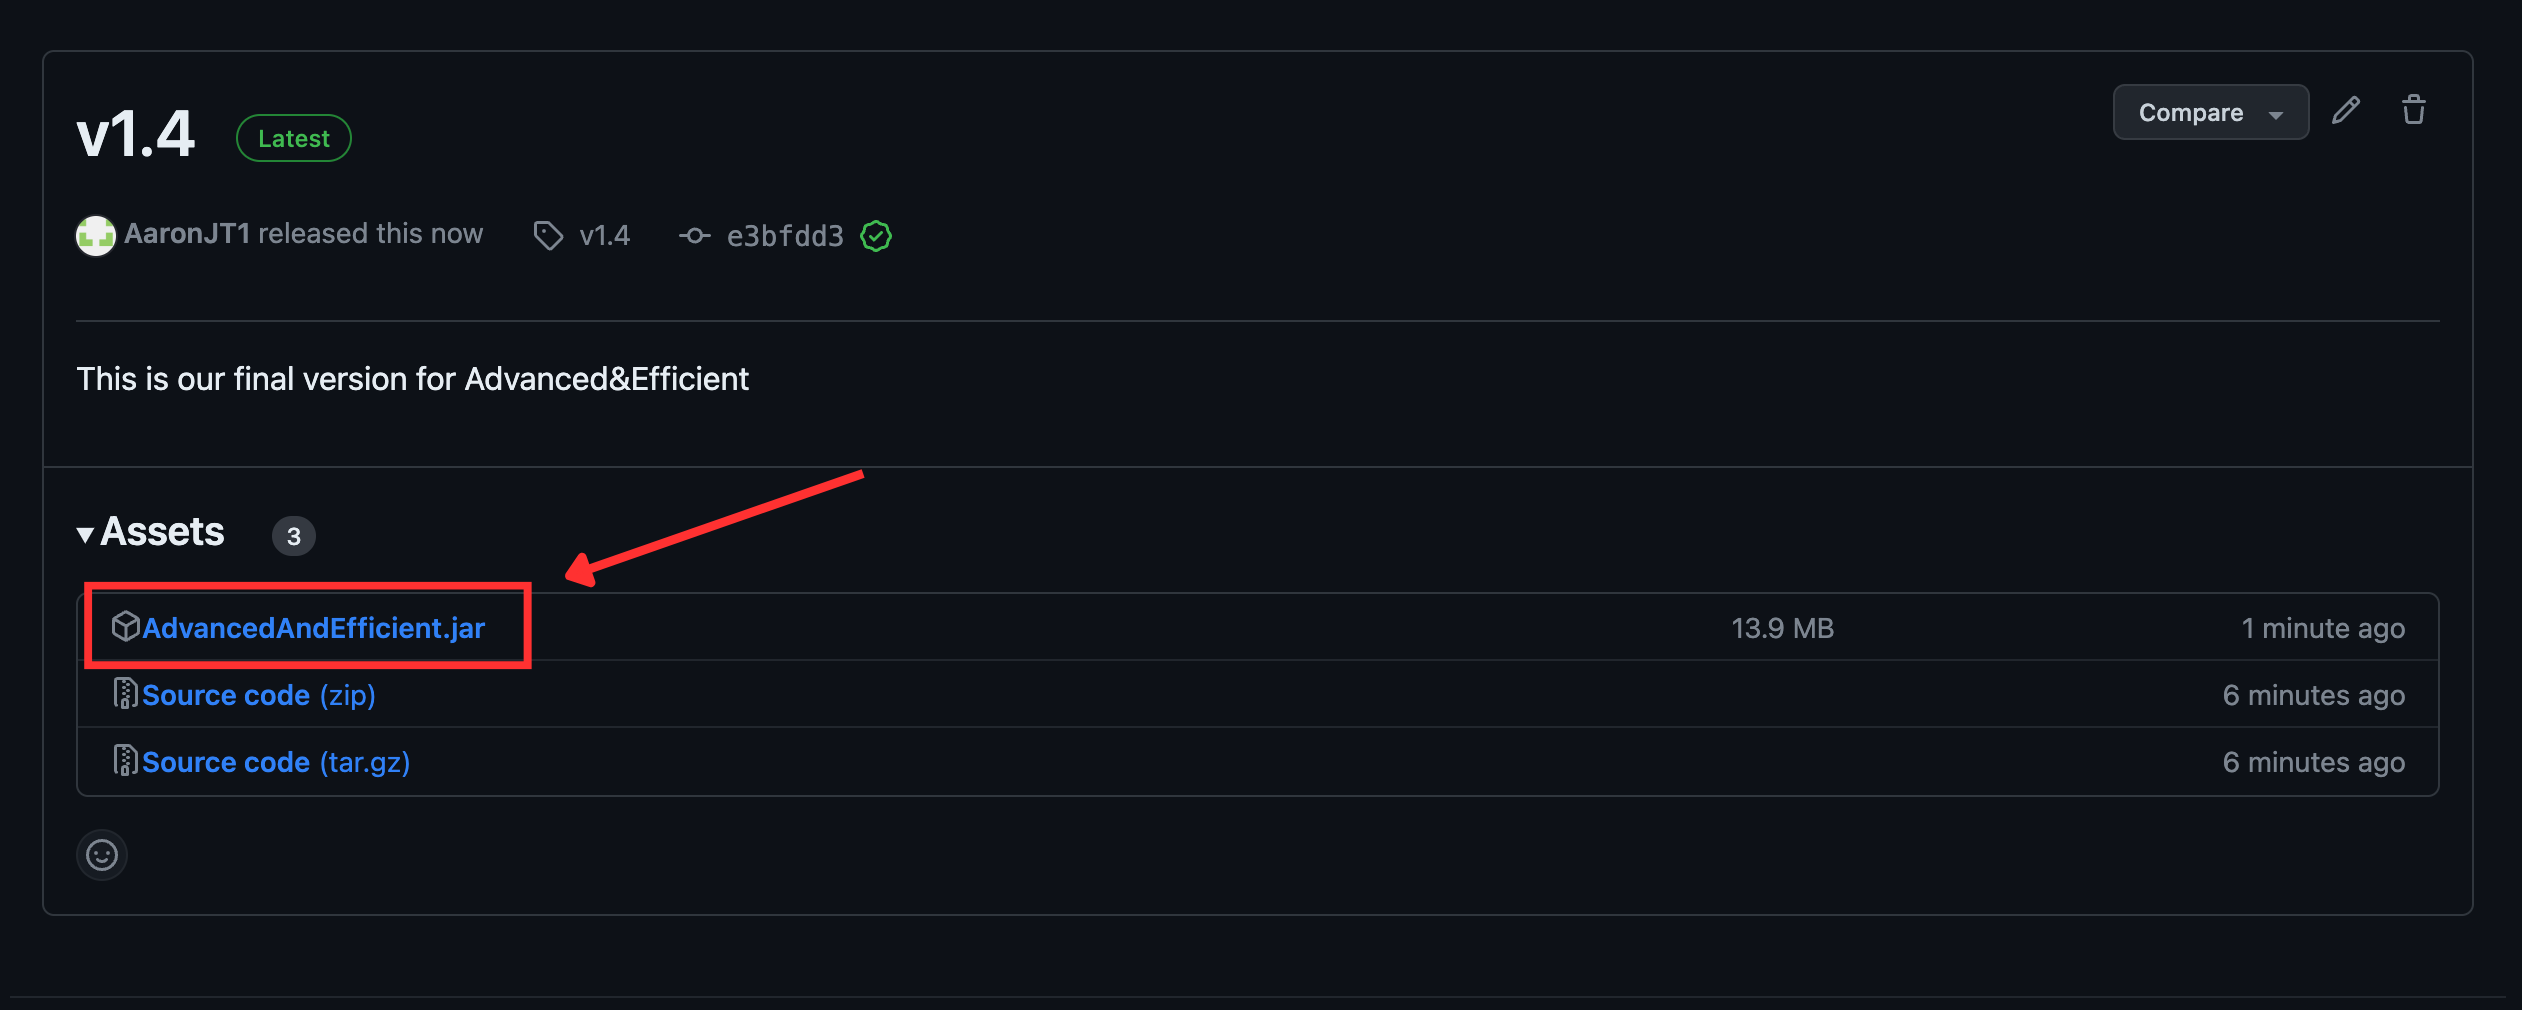
After downloading the application, move it into the “AAndE” folder created in step 2.
Open Terminal (as mentioned in step 1 part 1)
i. For Windows, type incd Desktop\AAndEto navigate to the folder you’ve created, and press Enter.
ii. For Mac, type incd Desktop/AAndEto navigate to the folder you’ve created, and press Enter.Then, type in
java -jar AdvancedAndEfficient.jarand press Enter again to run the application.A GUI similar to the picture below should appear in a few seconds. Note how the app contains some sample data.
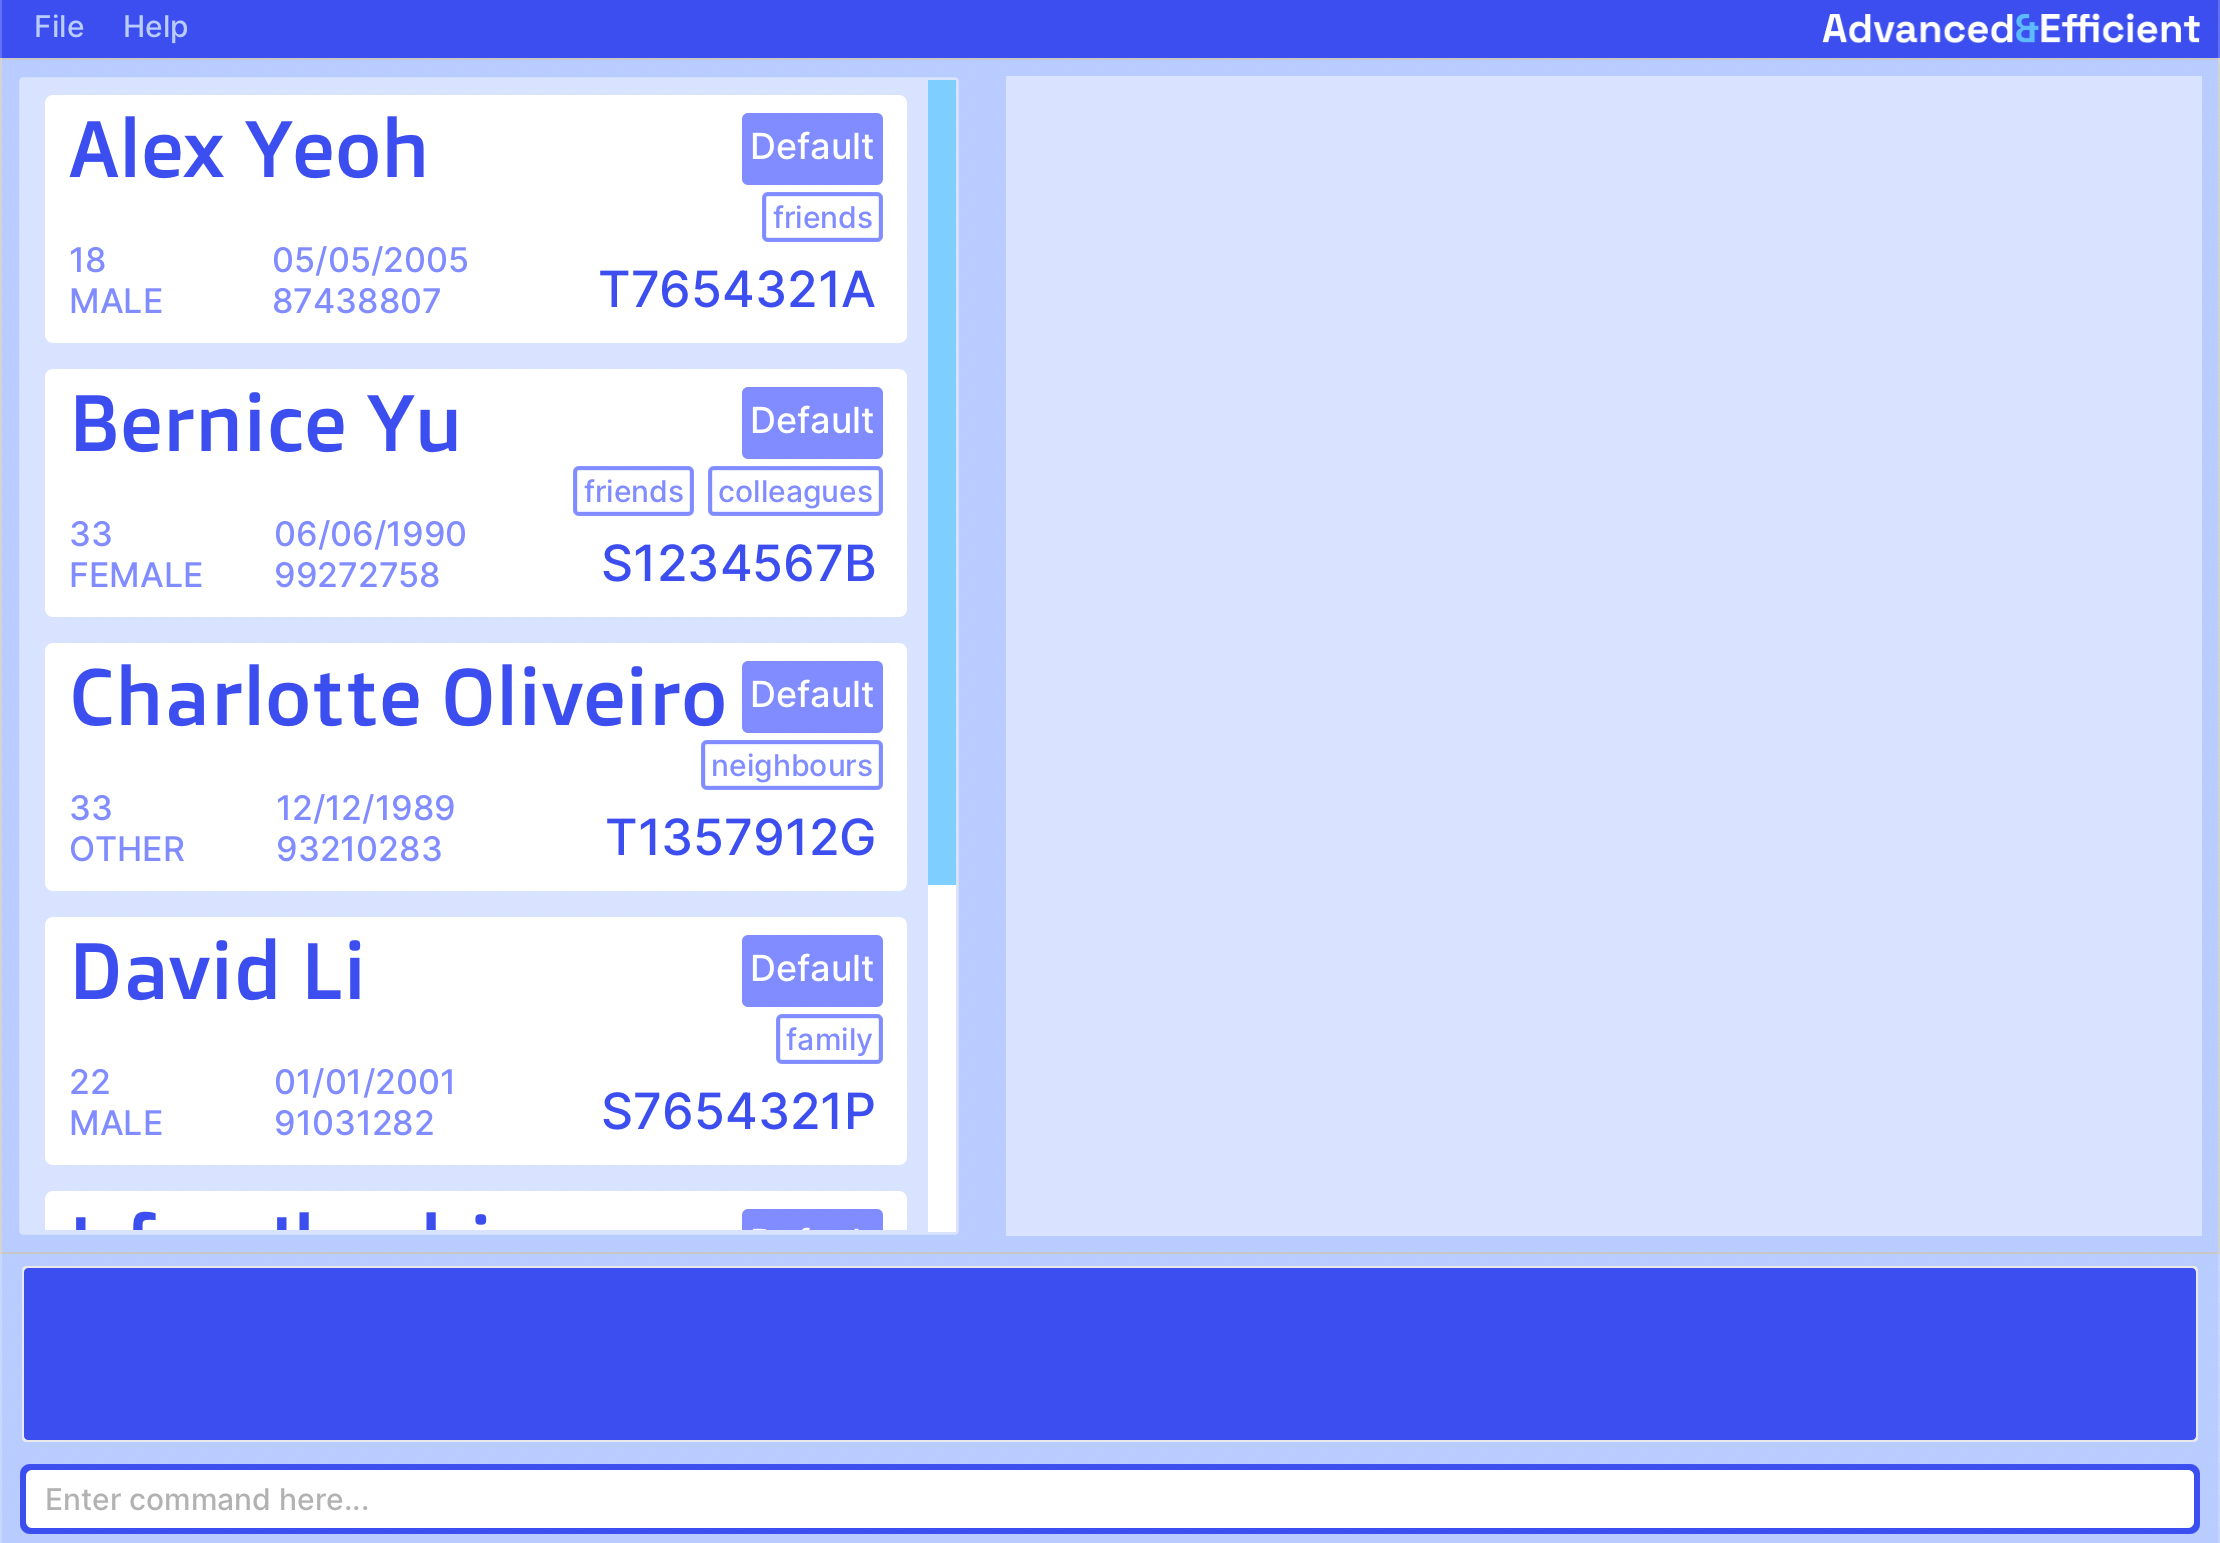
Tip: We strongly recommend you to use A&E at a resolution of 1024x640 for the fullest experience. You may also click on the fullscreen icon at the top right hand corner to enlarge the window.
Type the command in the command box and press Enter to execute it. e.g. typing
helpand pressing Enter will open the help window.Some example commands you can try:
list: Lists all patients.add n/John Doe i/T0384762A p/98765432 e/johnd@example.com a/John street, block 123, #01-01: Adds a patient named John Doe into the system.clear: Deletes all patients.exit: Exits the app.
Getting to Know A&E
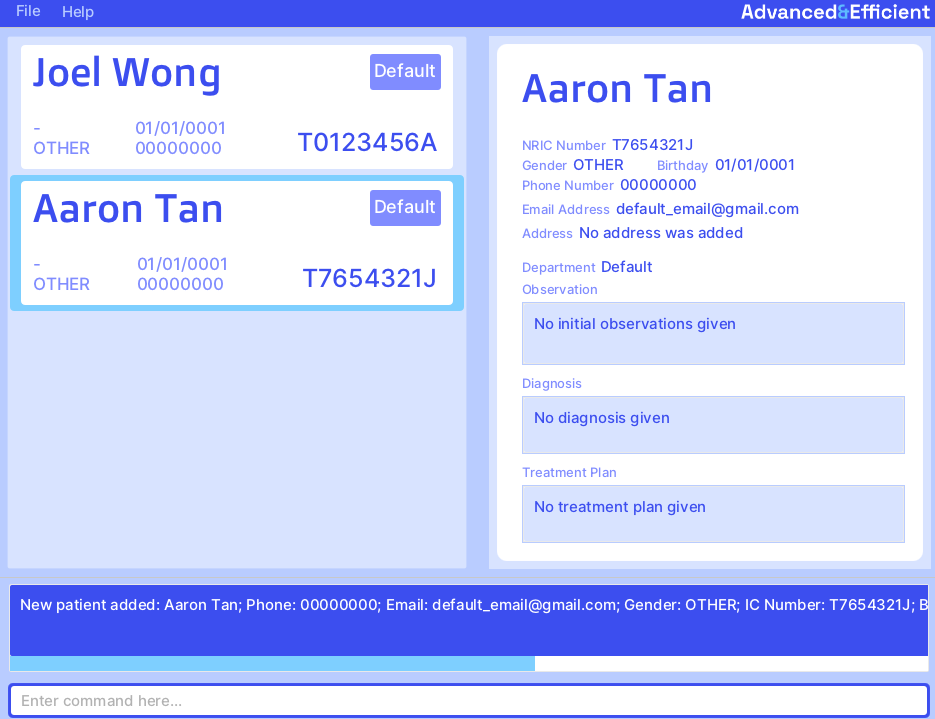
User Interface
Here is an overview of A&E’s user interface and some of its noteworthy components.
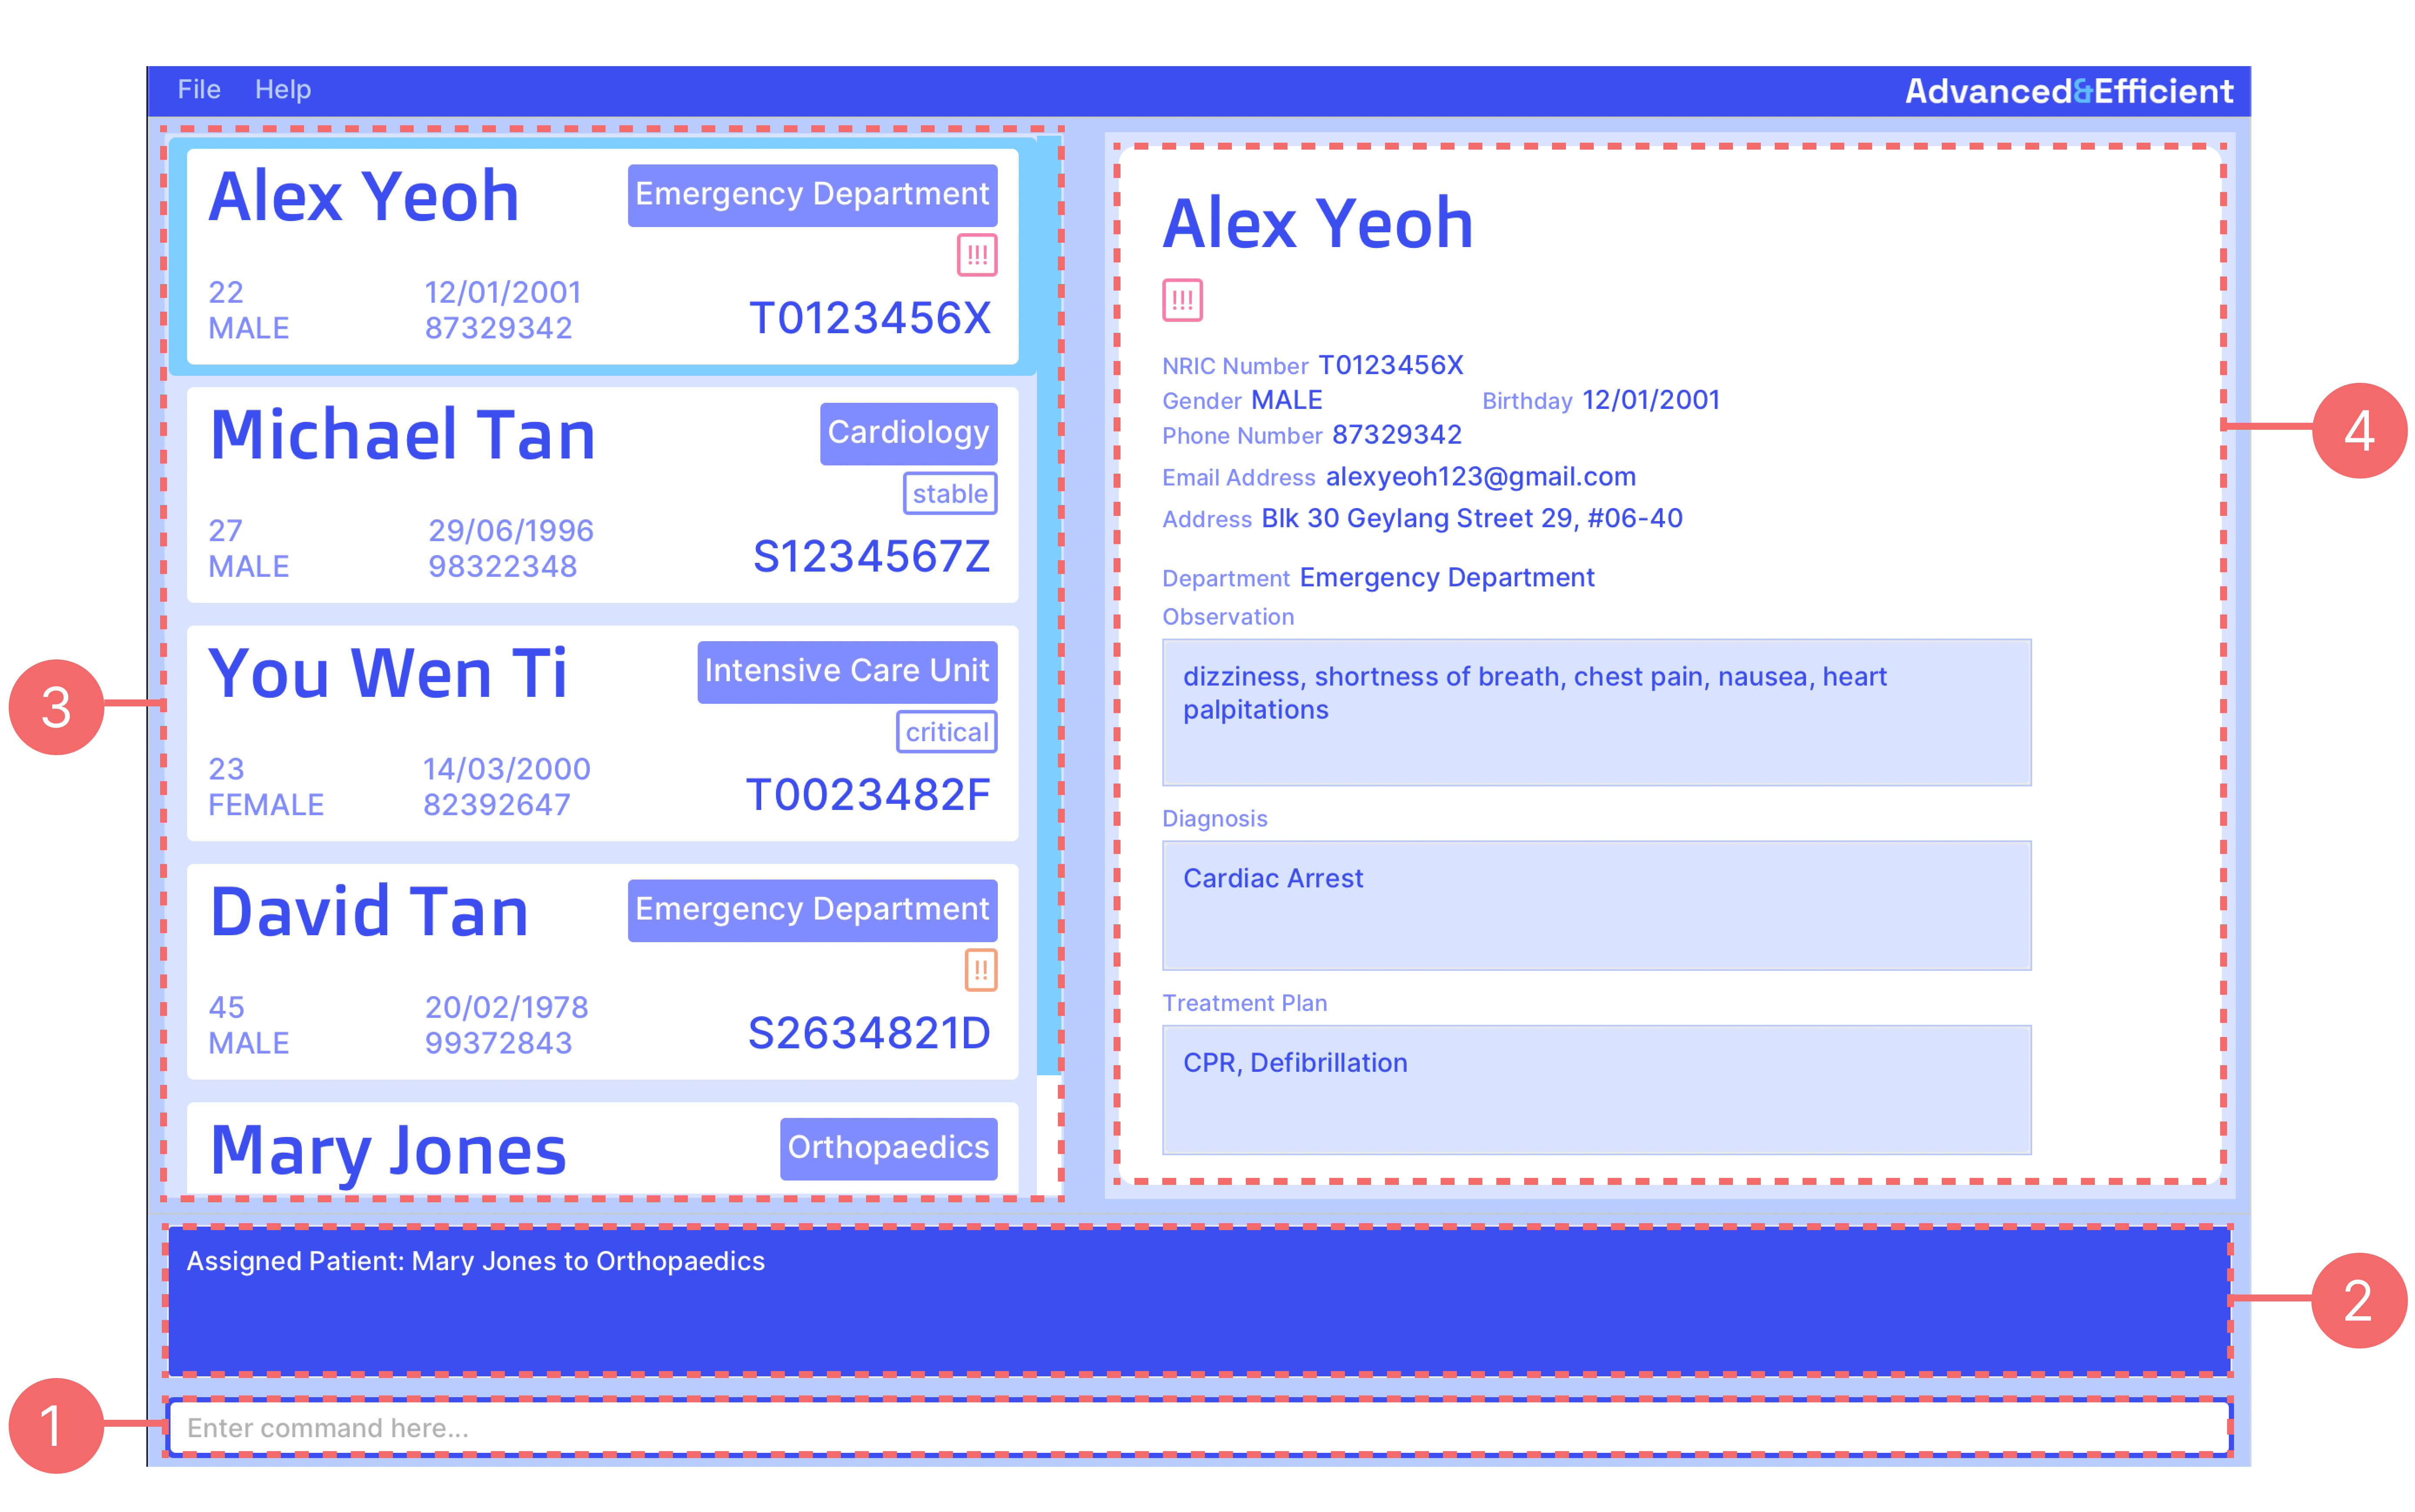
- Command Bar
- Console
- Patient List Panel
- Patient Record Panel
Command Bar
This is where you type in commands for the program to run. Refer to the Features or Command Summary section for the command inputs accepted by the app.
To begin typing, simply select the command bar by clicking the space that says “Enter command here…”. Then, type in your command and hit Enter to execute the command!

Console
This is where status messages are displayed. Status messages are displayed depending on the user input in the command box.
Status messages provide you with feedback such as:
- What a command does and its format
- Why a command input is invalid
- Whether a command is successful

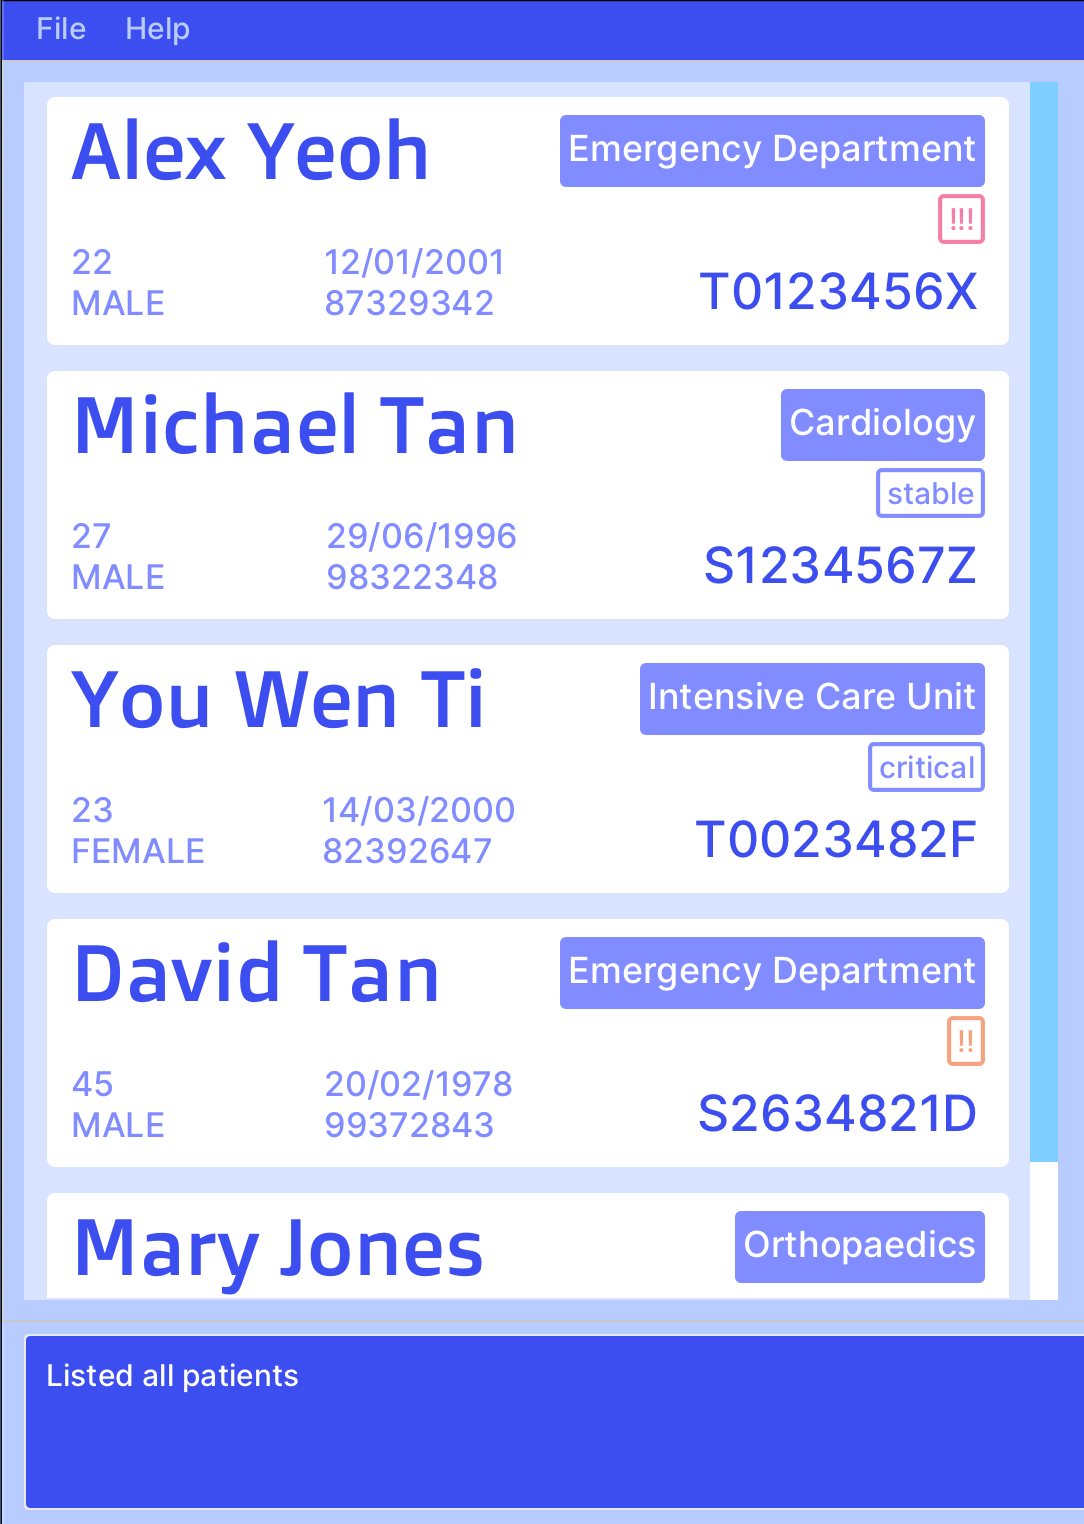
Patient List Panel
This is where the list of patients is displayed. It displays either the complete list of all patients in the system
(after list command), a filtered list of patients (after find command), or a single patient card
(after view command).
Patients are listed out vertically. You can scroll through the list using the scrollbar on the right side, your mouse’s scroll wheel, or your trackpad. To select a patient in the list, simply click on their patient card. The selected patient is indicated by the light blue border around their patient card.
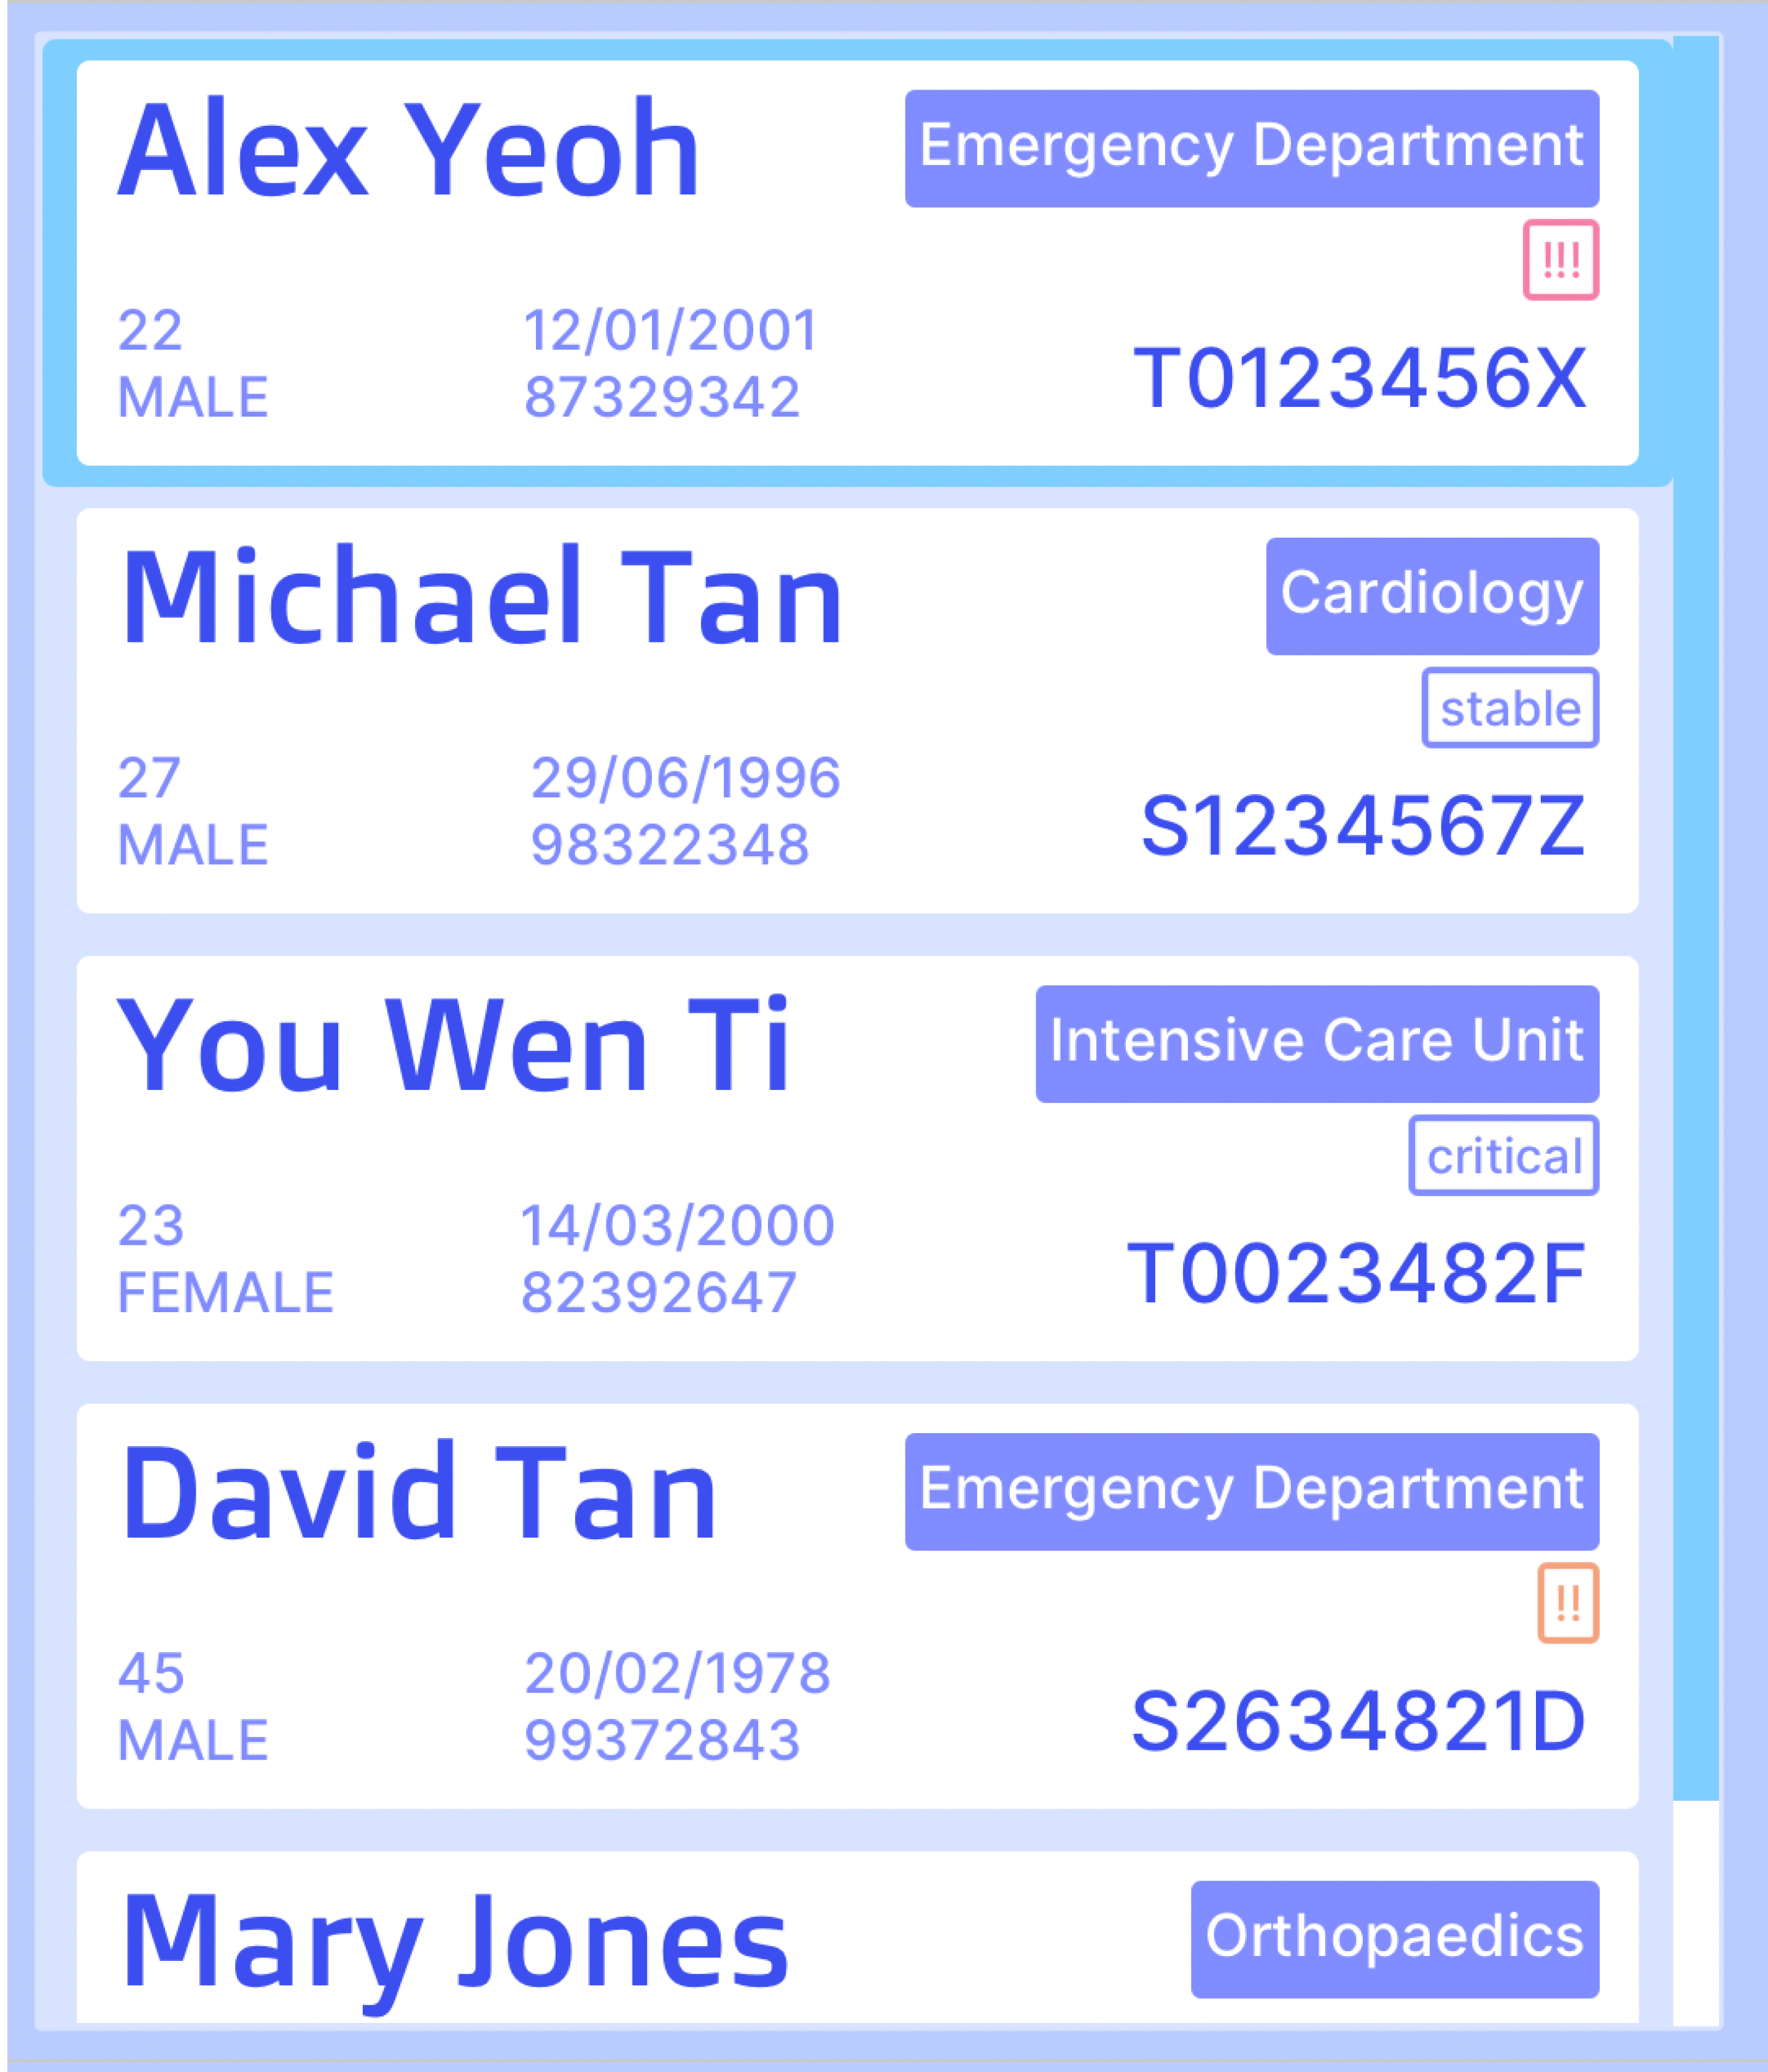
Each patient is represented by a patient card in the list. Here is an overview of the information displayed in a patient card.
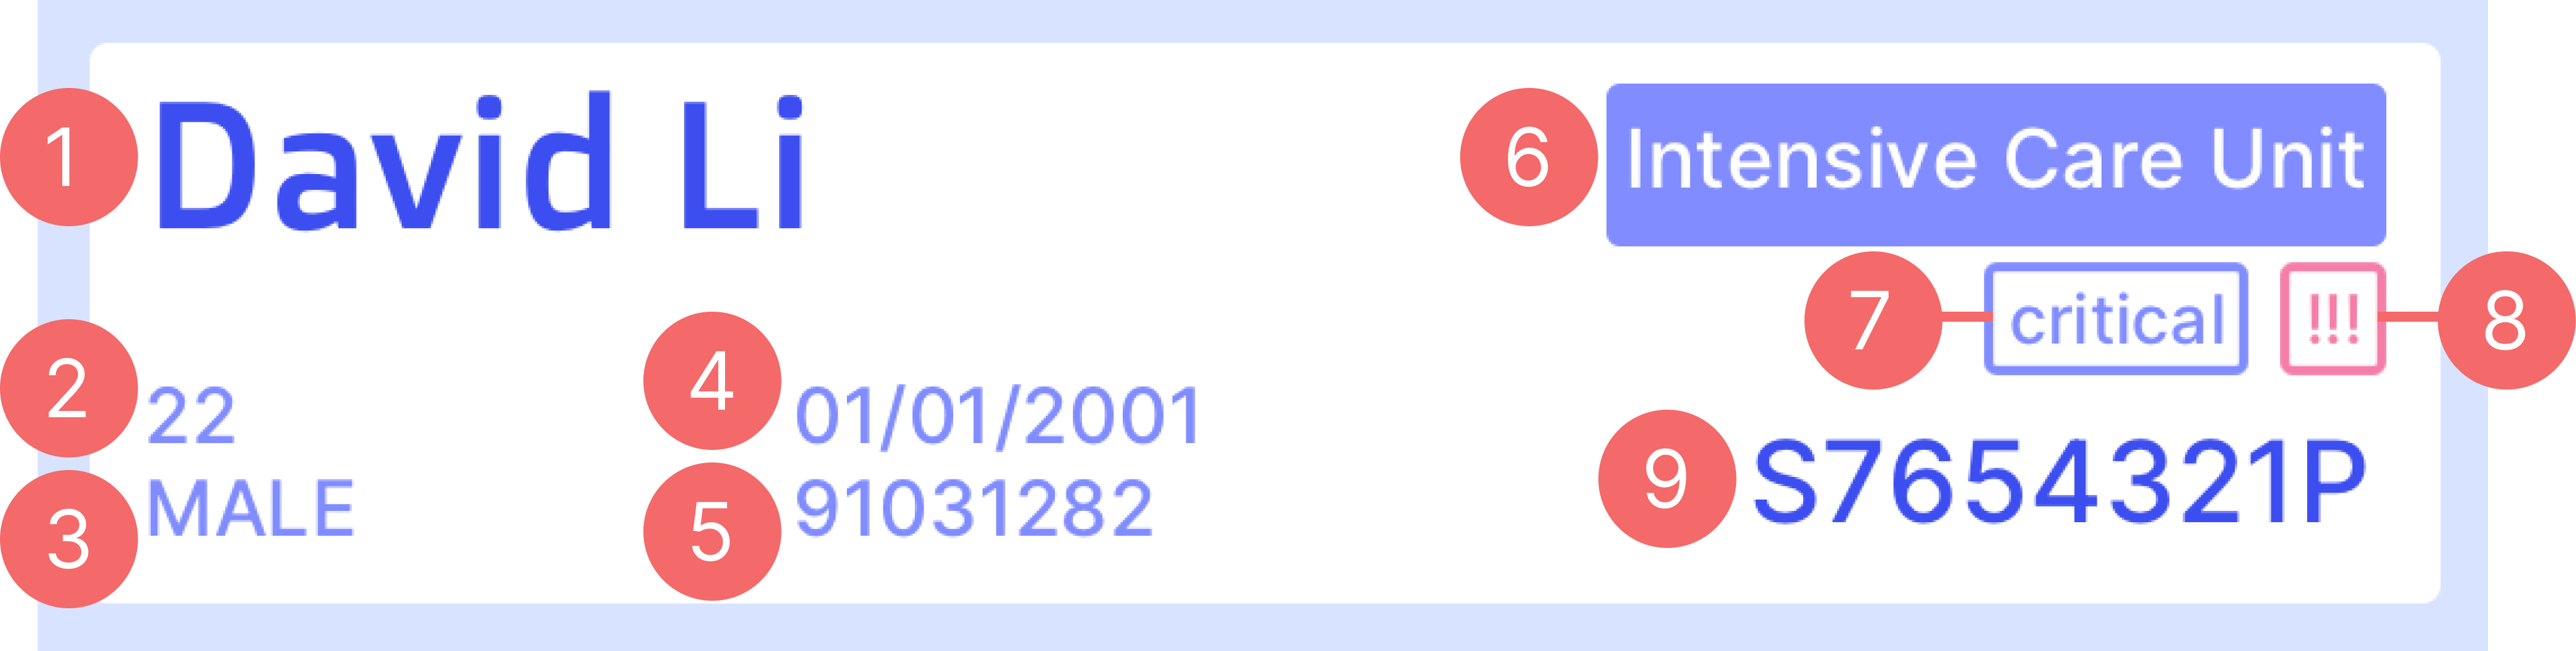
- Full Name
- Age
- Gender
- Birthday
- Phone Number
- Assigned Department
- Tag(s)
- Priority Tag


- IC Number
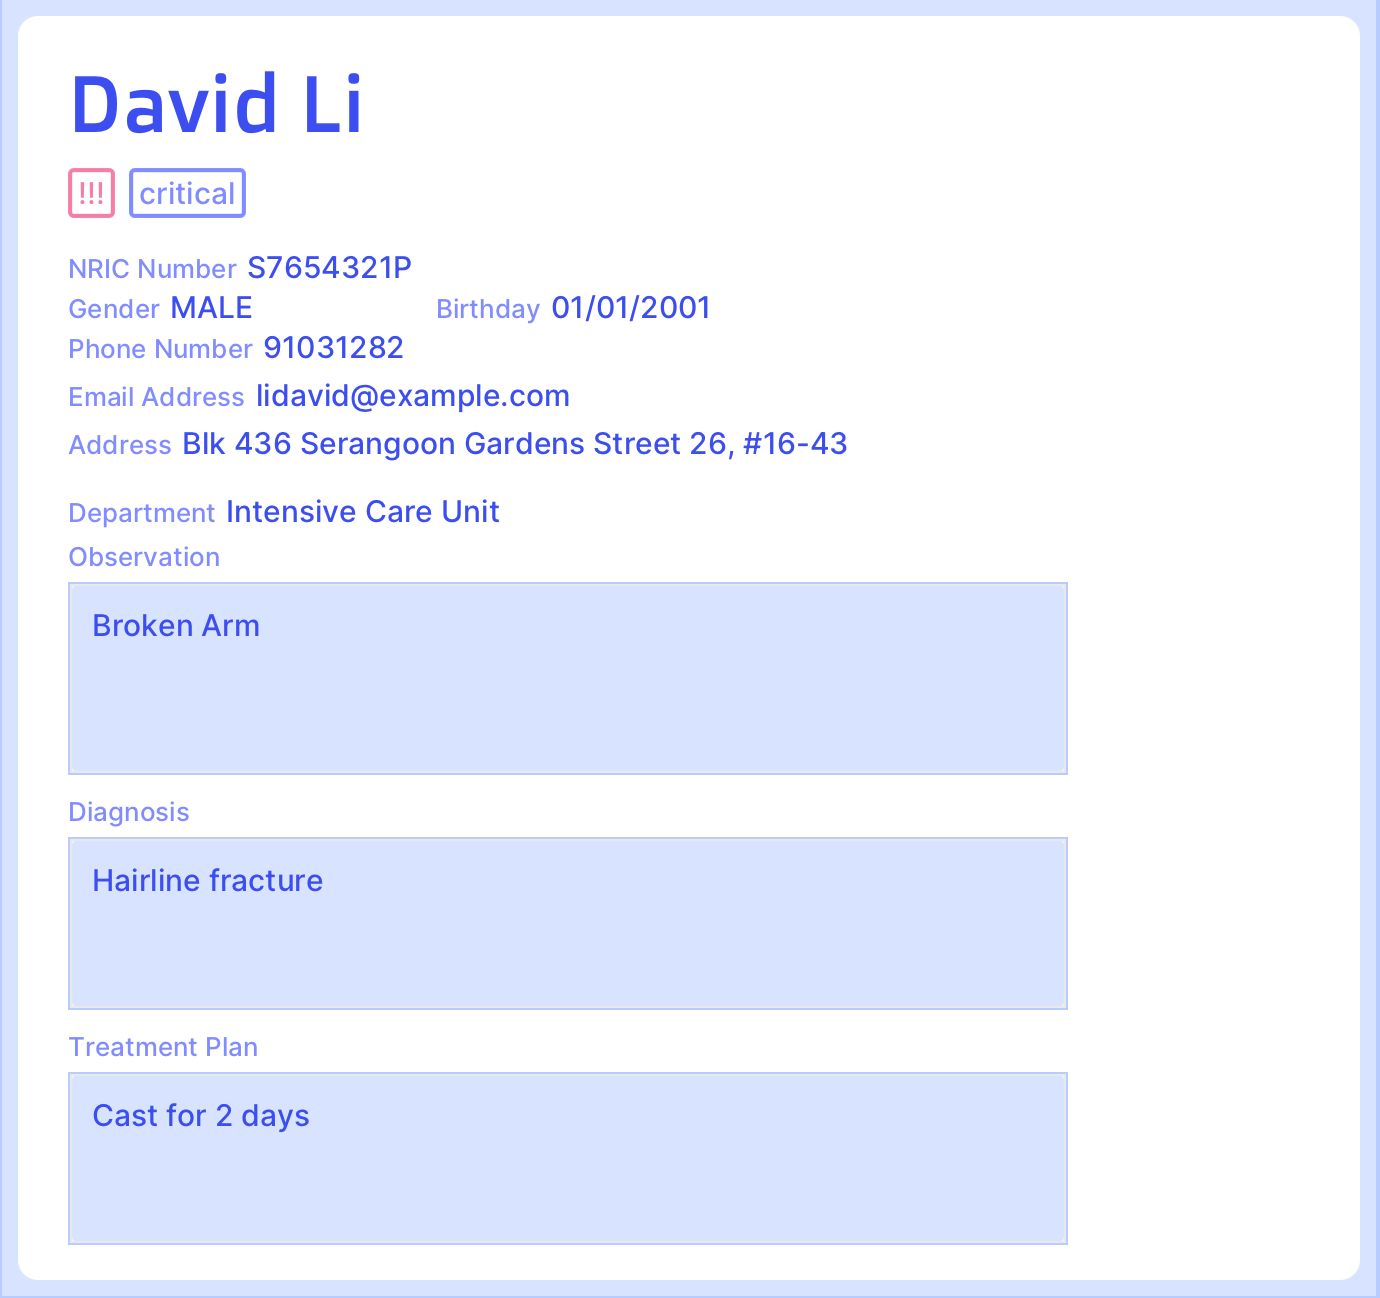
Patient Record Panel
This is where the details and record of the selected patient in the list is displayed. It displays all the details of a patient and all their patient record information, except for their age. The labels below the patient’s name indicate the patient’s priority level and tags respectively. If there is no selected patient in the list, the panel will be blank.
Features
Notes about the command format:
Words in
UPPER_CASEare the parameters to be supplied by the user. e.g. inadd n/NAME,NAMEis a parameter which can be used asadd n/John Doe.Items in square brackets are optional. e.g
n/NAME [pr/PRIORITY]can be used asn/John Doe pr/HIGHor asn/John DoeItems with
...after them can be used multiple times including zero times. e.g.[t/TAG]...can be used as(i.e. 0 times),t/critical,t/critical t/bedrestetc.Parameters can be in any order. e.g. if the command specifies
n/NAME p/PHONE,p/PHONE n/NAMEis also acceptable.Except for
n/NAME, all parameters are case-insensitive. e.g.n/john doeis different fromn/John Doe, buti/t1234567ais the same asi/T1234567A.Extraneous parameters for commands that do not take in parameters (such as
help,list,exit,undo,redo, andclear) will be ignored. e.g. if the command specifieshelp 123, it will be interpreted ashelp.If you are using a PDF version of this document, be careful when copying and pasting commands that span multiple lines as space characters surrounding line-breaks may be omitted when copied over to the application.
Prefix Summary
For some commands in the subsequent sections, you might come across parameters specified with a prefix
(e.g. prefix n/ with parameter NAME in n/NAME). These parameters refer to patient attributes or record fields that are
accepted by the command. Certain parameters have constraints and can only take on certain values. The table below
provides a summary of all prefixes.
| Attribute | Prefix | Parameter | Constraints/Format |
|---|---|---|---|
| Patient’s full name | n/ | NAME | Only alphanumeric characters and spaces |
| Patient’s NRIC number | i/ | IC_NUMBER | Must be an alphabet, followed by 7 numerical digits, then an alphabet E.g. T0123456A |
| Patient’s gender | g/ | GENDER | “Male”, “Female” or “Other” |
| Patient’s birthday | b/ | BIRTHDAY | Date in the format, DD/MM/YYYY |
| Patient’s phone number | p/ | PHONE | Only numbers, at least 3 digits long |
| Patient’s email address | e/ | EMAIL | An email address in the format, username@domain.com |
| Patient’s home address | a/ | ADDRESS | Any values |
| Patient’s priority level | pr/ | PRIORITY | “High”, “Medium”, “Low” or “NIL” |
| Patient’s tags | t/ | TAG | Alphanumeric characters, no spaces |
| Patient’s assigned department | d/ | DEPARTMENT | Refer to the appendix for the list of accepted values |
| Patient’s initial observations in their record | o/ | INITIAL_OBSERVATIONS | Any values |
| Patient’s diagnosis in their record | di/ | DIAGNOSIS | Any values |
| Patient’s treatment plan in their record | tp/ | TREATMENT_PLAN | Any values |
Viewing help: help
Shows a message explaining how to access the user guide.
Format: help
Expected output when command succeeds:

Listing all patients: list
Lists all patients in the system.
Format: list
Expected output when command succeeds:
Adding a patient: add
Adds a patient into the system.
Format: add n/NAME i/IC_NUMBER [g/GENDER] [b/BIRTHDAY] [p/PHONE_NUMBER] [e/EMAIL] [a/ADDRESS] [pr/PRIORITY] [t/TAG]...
- IC number cannot be edited after the patient has been added.
Caution: Duplicate patients are not allowed. Duplicate patients refer to patients with the same name and/or IC number.
- Names are case-sensitive
Han Bois different fromhan bo
- IC numbers are case-insensitive
T1234567Ais the same ast1234567a
Note: Optional fields not specified while adding the patient will be filled with default values as shown below.
Examples:
- To add a Patient with name "John Doe", IC number "T0123456A", gender "male", and birthday on 1 Jan 1990
add n/John Doe i/T0123456A g/Male b/01/01/1990
- To add a patient with name "Betsy Crowe", IC number "S0123456B", phone number "90909090", and email "bc@gmail.com"
add n/Betsy Crowe i/S0123456B p/90909090 e/bc@gmail.com
Viewing a patient: view
Displays a specific patient’s information and medical record.
Format: view i/IC_NUMBER
Examples:
- To view patient with IC number "T0123456A"
view i/T0123456A
Expected output when command succeeds:
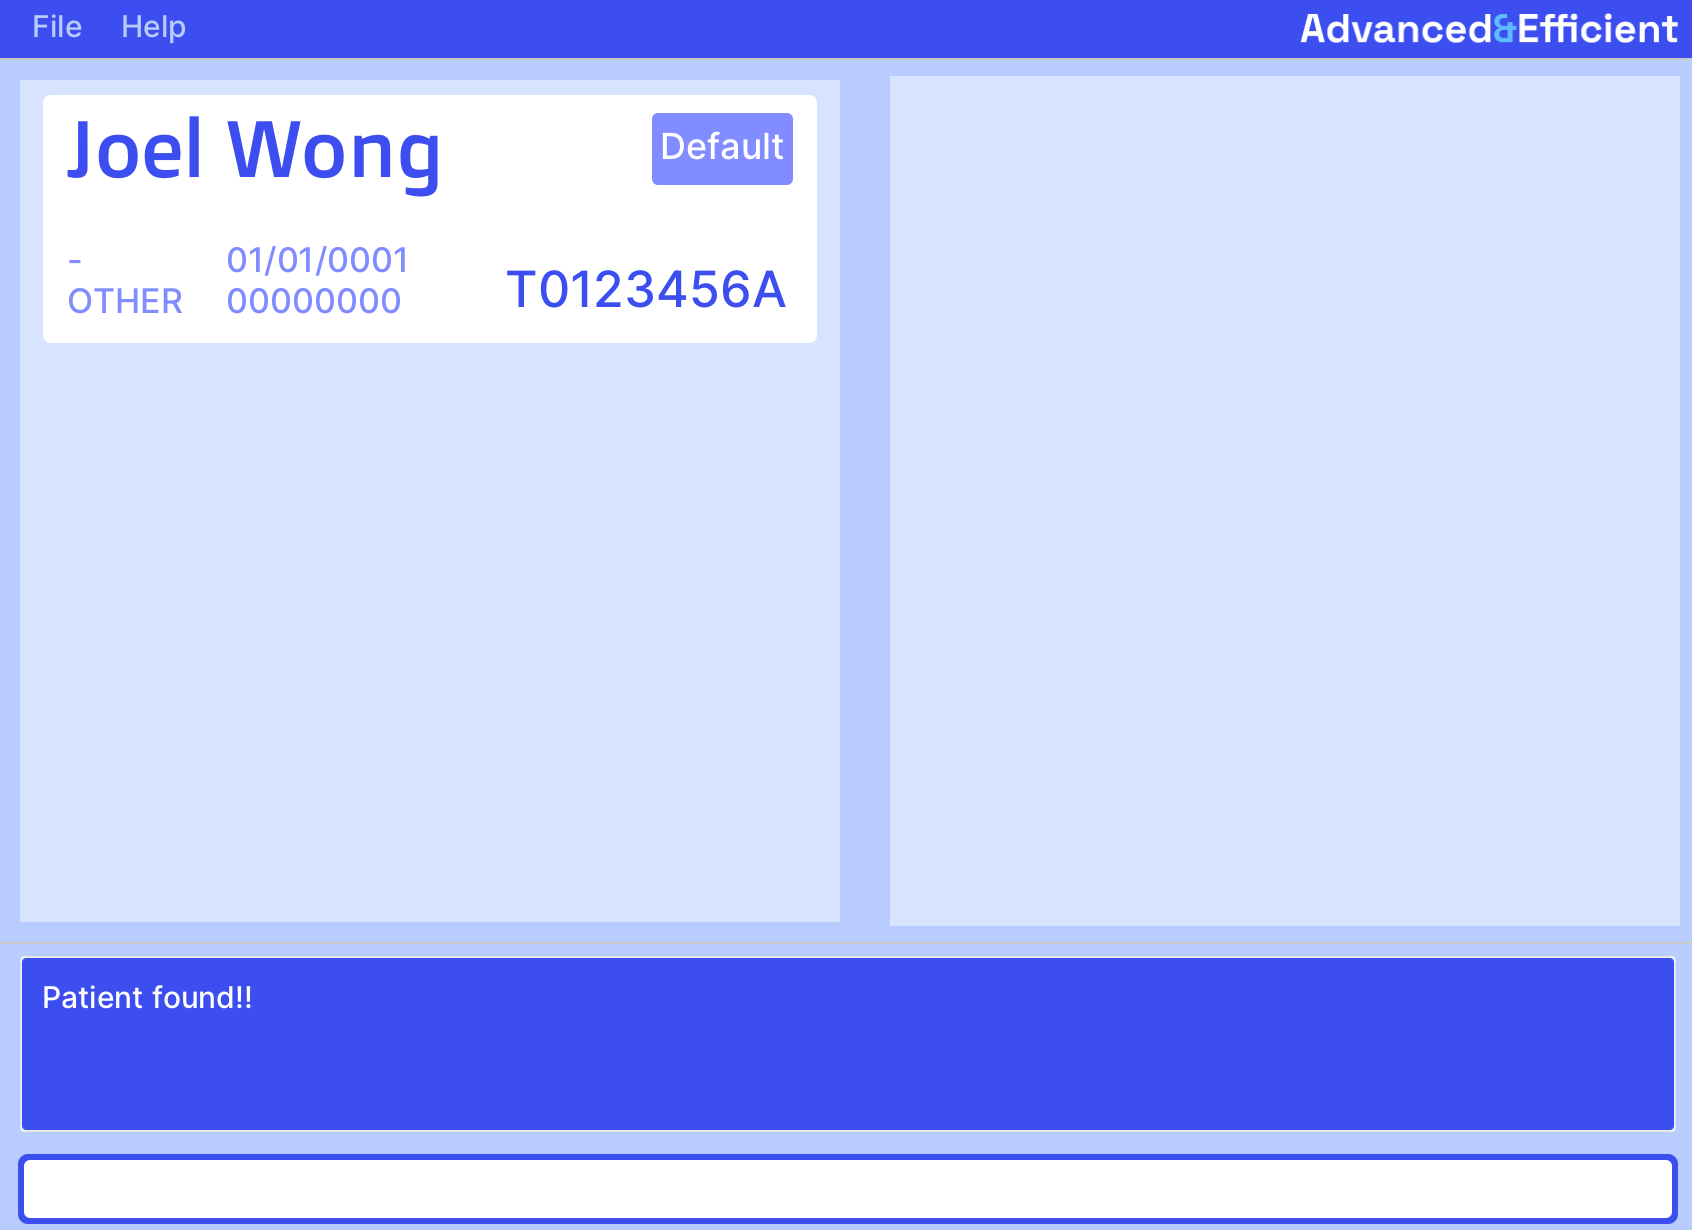
Note: The command will not display the patient’s record card in the record panel immediately. To view the patient’s details and record card, you have to click on their patient card in the list.
Editing a patient: edit
Edits the information of a patient with the specified IC number.
Format: edit i/IC_NUMBER [n/NAME] [g/GENDER] [b/BIRTHDAY] [p/PHONE_NUMBER] [e/EMAIL] [a/ADDRESS] [pr/PRIORITY] [t/TAG]...
- At least one of the optional fields indicated within square brackets must be provided.
Caution: The new name provided cannot be the same as the name of another patient in the list.
- Names are case-sensitive
Han Bois different fromhan bo
Note: When editing tags, the new tags specified will overwrite the existing tags i.e. all existing tags will be discarded and replaced with the new tags.
Examples:
- To edit the birthday of a patient with IC number "T0123456A" to 10 Jan 2000
edit i/T0123456A b/10/01/2000 - To edit the phone number and email of a patient with IC number "S0123456B" to "87621527" and "betsyc@hotmail.com" respectively
edit i/S0123456B p/87621527 e/betsyc@hotmail.com
Deleting a patient: delete
Deletes the patient with the specified IC number.
Format: delete i/IC_NUMBER
Examples:
- To delete a patient with IC number "T2468012A"
delete i/T2468012A
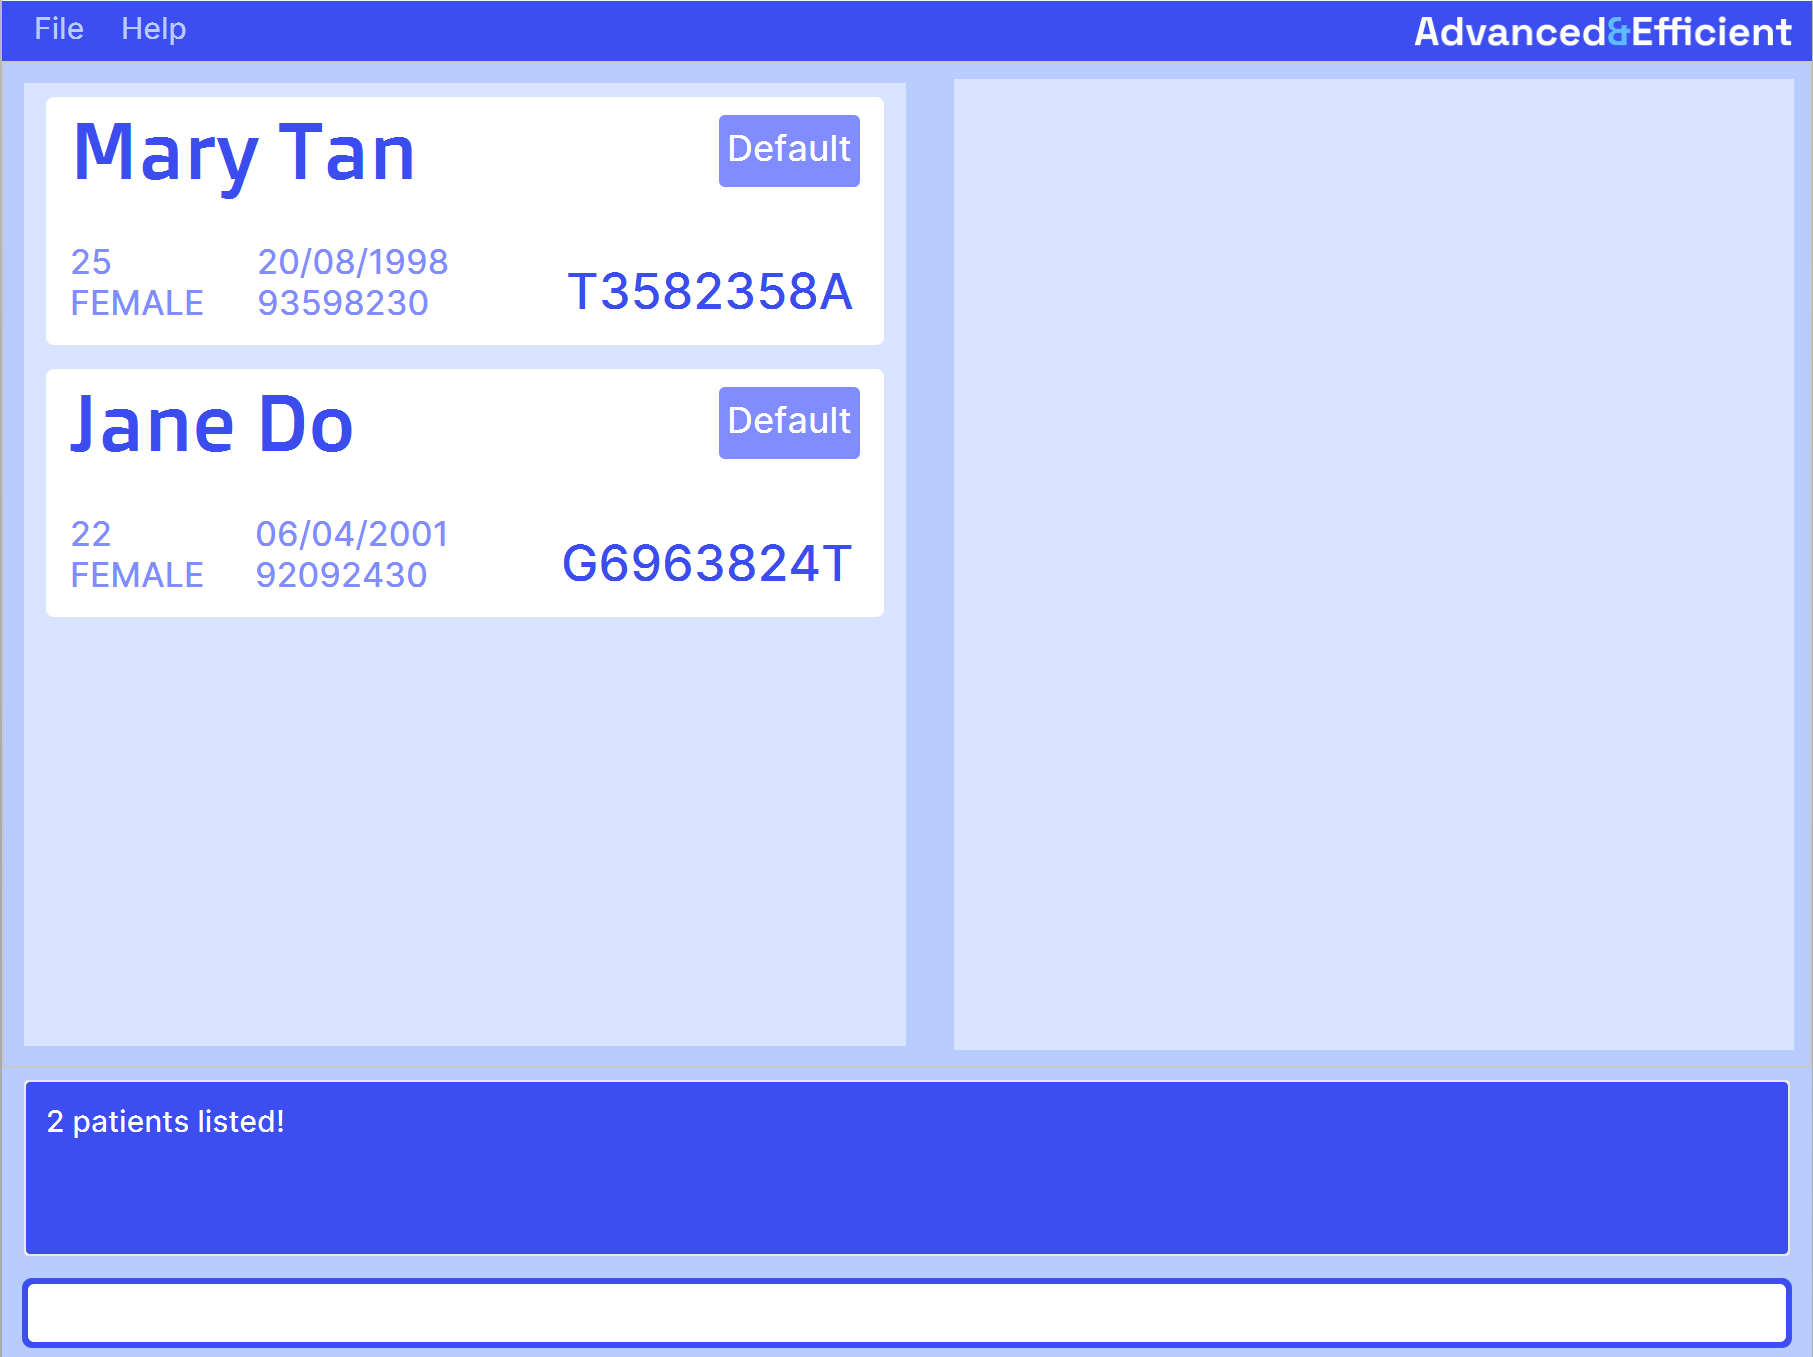
Finding a patient by name: find
Finds the patients whose names match any of the given keywords.
Format: find KEYWORD [MORE_KEYWORDS]...
- The order of the keywords does not matter. e.g.
Hans Bowill matchBo Hans - Only the name is searched.
- Only full words will be matched. e.g.
Hanwill not matchHans. - Persons matching at least one keyword will be returned. e.g.
Hans Bowill returnHans Gruber,Bo Yang.
Examples:
- To find patients whose name matches "John"
find john - To find patients whose name matches "Mary" and "Jane"
find Mary Jane
Expected output when command succeeds:
Sorting the patient list: sort
Sorts the patient list based on the given property.
Note:
It sorts both the filtered and full patient list. For example, if you run find John followed by sort age on the
list of search results, it will also sort the complete list of patients (displayed using the list command).
Format: sort PROPERTY
PROPERTYcan only bename,ic,department,age, orpriority.
Examples:
- To sort the patient list according to name in alphanumeric order
sort name - To sort the patient list according to IC number in alphanumeric order
sort ic - To sort the patient list according to department (with default departments at the bottom of the list)
sort department - To sort the patient list according to ascending age (with default age at the top of the list)
sort age - To sort the patient list according to descending priority
sort priority
Editing a patient record: record
Edits the medical record of the patient with the specified IC number.
Format: record i/IC_NUMBER [o/INITAL_OBSERVATIONS] [di/DIAGNOSIS] [tp/TREATMENT_PLAN]
- At least one of the optional fields indicated within square brackets must be provided.
Examples:
- To edit the medical record of a patient with IC number "T0201234A"
record i/T0201234A o/Broken Arm di/Hairline fracture tp/Cast for 2 days - To edit the medical record of a patient with IC number "S2374912B"
record i/S2374912B di/Asthma o/Shortness of breath and chest tightness
Assigning a patient to a department: assign
Assigns a patient to a hospital department.
Format: assign i/IC_NUMBER d/DEPARTMENT
Caution: DEPARTMENT must adhere to British spelling conventions. Refer to the appendix
below for the list of valid departments and their accepted inputs.
Examples:
- To assign a patient with IC number "T0201234A" to the cardiology department
assign i/T0201234A d/cardiology
Undoing a command: undo
Undos the most recent command. Only applies to the following commands:
deleteeditclearaddassign
Format: undo
Examples:
delete i/T1234567Adeletes the patient with the IC number "T1234567A" from the patient list.undorestores this patient back into the patient list.
Redoing a command: redo
Redos the most recently undone command. Only applies to the following commands:
deleteeditclearaddassign
Format: redo
Examples:
delete i/T1234567Adeletes the patient with IC number "T1234567A" from the patient listundorestores this patient back into the patient list.redoonce again deletes this patient from the patient list.
Clearing all entries: clear
Clears all patients from the system.
Format: clear
Exiting the program: exit
Exits the program.
Format: exit
Saving the program
Advanced&Efficient data is saved in the hard disk automatically after any command that changes the data. There is no need to save manually.
Editing the data file
Advanced&Efficient data are saved automatically as a JSON file [JAR file location]/data/aande.json. Advanced
users are welcome to update data directly by editing that data file.
Caution: If your changes to the data file makes its format invalid, Advanced&Efficient will discard all data and start with an empty data file at the next run. Hence, it is recommended to take a backup of the file before editing it.
FAQ
Q: I double-clicked the Jar file and it doesn't run, why?
A: Make sure that Java 11 is installed and do refer to step 5 of Quick Start for instructions to run
application.
Q: I have a list of patients, how do I view their details?
A: Please click on the patient you are interested in viewing. The details will be on the right hand side in the
Patient Record Panel.
Q: The Patient List Panel is cut off, I can't see some details for each patient.
A: Please resize the application by dragging the border of the application window with your mouse. If the appplication is already in full screen mode, please drag the divider between the Patient List Panel and Patient
Record Panel to the right.
Q: I entered a command and there is no response from the application, what do I do?
A: A critical error might have occurred. Please ensure your command is as specified in Features. Please contact
the technical team in charge of your department to file a bug report on our issues page.
Q: I have accidentally cleared the whole patient record system, can I retrieve the lost data?
A: Yes, A&E has the Undo feature which allows you to retrieve all the lost data.
Q: Will my data be saved immediately?
A: Yes, A&E saves your data automatically after every command executed.
Q: How do I transfer my data to another computer?
A: Install the app in the other computer and overwrite the empty data file it creates with the file that contains
the data of your previous AAndE home folder.
Known issues
When using multiple screens, if you move the application to a secondary screen, and later switch to using only the primary screen, the GUI will open off-screen. The remedy is to delete the preferences.json file created by the application before running the application again.
Age is not displayed in the Patient Record Panel of UI.
The UI of the app might appear ‘squashed’ upon launch i.e. not all details can be visible. To avoid this, we advise users to use our application in full screen.
The use of extra and invalid prefixes/parameters will not be detected properly, resulting in the wrong error message being displayed.
Long tags cannot be displayed properly in the app and might overlap with other details of the patient in the patient card. As such, we advise against the use of long tags.
Some invalid birthdays can be added/edited to a patient e.g. 30 February.
For the
viewcommand, users will have to click on the patient card themselves in order to see the patient’s details and record.The minimize button for the help window might not work for some users.
Currently, any alphabets are accepted for the start of an IC number. Ideally, only letters "S", "T", "F", "G" or "M" are accepted for the start of an IC number.
Command Summary
| Action | Format, Examples |
|---|---|
| Help | help |
| List | list |
| Add | add n/NAME i/IC_NUMBER [g/GENDER] [b/BIRTHDAY] [p/PHONE_NUMBER] [e/EMAIL] [a/ADDRESS] [pr/PRIORITY] [t/TAG]... e.g. add n/Betsy Crowe i/S0123456B g/FEMALE b/23/12/1994 p/90909090 e/bc@gmail.com a/Old Town Road 4 pr/low t/stable |
| View | view i/IC_NUMBERe.g. view i/T0201234A |
| Edit | edit i/IC_NUMBER [n/NAME] [g/GENDER] [b/BIRTHDAY] [p/PHONE] [e/EMAIL] [a/ADDRESS] [pr/PRIORITY] [t/TAG]...e.g. edit i/T0201234A n/Moira Crow g/MALE b/08/08/1999 p/93827836 e/example@email.com a/Old Time Road Block 3 pr/high t/bedrest |
| Delete | delete i/IC_NUMBERe.g. delete i/T2468012A |
| Find | find KEYWORD [MORE_KEYWORDS]...e.g. find Mary Jane |
| Sort | sort PROPERTYe.g. sort name, sort ic, sort department, sort age, sort priority |
| Record | record i/IC_NUMBER [o/INITAL_OBSERVATIONS] [di/DIAGNOSIS] [tp/TREATMENT_PLAN]e.g. record i/T0201234A o/Broken Arm di/Hairline fracture tp/Cast for 2 days |
| Assign | assign i/IC_NUMBER d/DEPARTMENTe.g. assign i/T0201234A d/Cardiology |
| Undo | undo |
| Redo | redo |
| Clear | clear |
| Exit | exit |
Glossary
Command-Line Interface
A command-line interface (CLI) is a text-based user interface (UI) used to run programs, manage computer files and interact with the computer, involving more typing than clicking.
Graphical User Interface
A graphical user interface (GUI) is a digital interface in which a user interacts with graphical components such as icons, buttons, and menus, often by clicking.
Java 11
Java is the programming language used in creating A&E. “11” refers to the version of the language used.
Appendix: Departments
The table below shows all the hospital departments available in the system and their accepted inputs.
Related commands: Assign
| Department | Acceptable Input(s) |
|---|---|
| Default | Default |
| Anaesthesiology | Anaesthesiology |
| Cardiology | Cardiology |
| Dermatology | Dermatology |
| Emergency Department | Emergency Department |
| Endocrinology | Endocrinology |
| General Surgery | General Surgery |
| Geriatric Medicine | Geriatric Medicine |
| Gynaecology | Gynaecology |
| Haematology | Haematology |
| Immunology | Immunology |
| Infectious Diseases | Infectious Diseases |
| Intensive Care Unit | Intensive Care Unit |
| Oncology | Oncology |
| Ophthalmology | Ophthalmology |
| Orthopaedics | Orthopaedics |
| Neurology | Neurology |
| Neurosurgery | Neurosurgery |
| Pathology | Pathology |
| Palliative Medicine | Palliative Medicine |
| Plastic Surgery | Plastic Surgery |
| Psychiatry | Psychiatry |
| Radiology | Radiology |
| Urology | Urology |